Create Self-Signed S/MIME Certificates

E-mail is a common channel for sending sensitive information, despite rarely being secured for that purpose. With recent news stories about e-mail account hacks and interceptions by third parties, sending anything containing private information through standard plain-text e-mail is increasingly difficult to justify. The process of buying a home in the United States illustrates this well: the amount of sensitive information transferred back and forth between the various parties is staggering, and it is primarily done through plain-text e-mail.
So, what is the alternative?
While this article does not address the larger systemic issues around private information transfer, it does provide a basic method for public-key encryption and signing of MIME data (e-mail) using the S/MIME standard. Most well-known e-mail clients support S/MIME, and this article provides instructions for creating a certificate authority (CA) to issue self-signed S/MIME certificates.
NOTE: These steps were tested using the Win64 OpenSSL v4.0.0 Light (EXE) distribution available on the Win32/Win64 OpenSSL Installer for Windows - Shining Light Productions website.
A Very Brief Primer on Public-Key Encryption
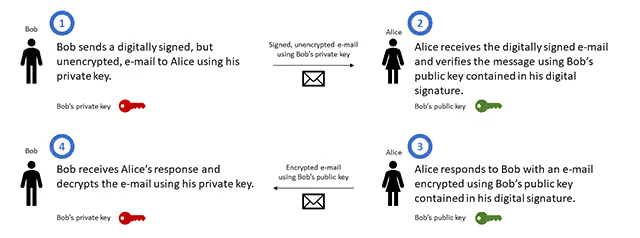
Since certificates are based on public-key encryption, also known as public-key cryptography or asymmetric cryptography, the public key of the intended e-mail recipient is required to encrypt the e-mail. Conversely, sending an encrypted e-mail to a particular recipient requires that recipient’s public key.
As an example, if Alice wants to send an encrypted e-mail to Bob, Alice needs Bob’s public key to encrypt the e-mail. When Bob receives the encrypted e-mail from Alice, Bob’s e-mail client uses his personal private key to decrypt the e-mail. If Bob wants to send Alice an encrypted e-mail, he needs Alice’s public key to encrypt the e-mail.
This article steps through the creation of a personal public/private key pair. The public key is what an e-mail sender needs to encrypt an e-mail sent to the certificate holder. The private key is kept only by the certificate holder, since it is used to decrypt any e-mails encrypted using the corresponding public key. If the private key is obtained by anyone else, that person is able to decrypt and read the associated encrypted e-mails.
Is There an Easier Way?
Yes. A basic certificate can be obtained for free from a number of companies. Those companies are not listed in this article because they tend to require a “free” sign-up and then proceed to inundate the new subscriber with spam.
However, creating a self-signed certificate avoids reliance on an external party, and it also provides an opportunity to learn more about public-key encryption along the way.
Instructions
Step 1: Install OpenSSL
OpenSSL is used to create a certificate authority, which is then used to sign the personal certificate. The latest OpenSSL toolkit is found at the OpenSSL website. If a binary distribution is needed (for example, pre-compiled installation files for Microsoft Windows), the distributions available at the Shining Light Productions website are a reliable option.
After locating the appropriate distribution for the operating system, follow the installation instructions provided with that distribution.
This article uses a Windows distribution; some steps are specific to that operating system. The examples in this article assume OpenSSL is installed in the c:\openssl\ directory.
Step 2: Create an OpenSSL Configuration File
NOTE: This step may not be necessary depending on the particular OpenSSL distribution. In some OpenSSL distributions, the basic configuration file already includes the required extensions referenced below. In other distributions, a basic configuration file is not provided at all. If the default configuration file has the following extensions and they are duplicated in a custom configuration file, errors are thrown in Step 4 and Step 7. With the distribution referenced in the opening note of this article, there is a default configuration file containing the appropriate
[req],[req_distinguished_name], and[v3_ca]sections, so those sections are not needed insmime.cnf. However,smime.cnfis still used, specifically the[smime]section, to set the appropriate extensions in Step 7. If the same distribution is in use, the default configuration file may be found atc:\Program Files\Common Files\SSL\openssl.cnf.
Now that OpenSSL is installed, a configuration file is needed. If openssl.exe is executed at this point without the configuration file in place, the message WARNING: can't open config file: /usr/local/ssl/openssl.cnf is displayed.
Create a new file named smime.cnf containing the following configuration. The contents of the file follow the x509 certificate extension configuration format. For more information about the file format and content, review the x509 v3 configuration page. The [req] and [req_distinguished_name] sections are generally part of any standard OpenSSL configuration file. Some distributions include a default configuration file that includes a version of these sections. This resolves the error unable to find 'distinguished_name' in config.
NOTE: The
[v3_ca]and[smime]sections are the important sections for this exercise because they set the appropriate extensions for an S/MIME certificate authority and personal certificates.
[req]
distinguished_name = req_distinguished_name

[req_distinguished_name]
countryName = Country Name (2 letter code)
countryName_default = AU
countryName_min = 2
countryName_max = 2
stateOrProvinceName = State or Province Name (full name)
stateOrProvinceName_default = Some-State
localityName = Locality Name (eg, city)
0.organizationName = Organization Name (eg, company)
0.organizationName_default = Internet Widgits Pty Ltd
organizationalUnitName = Organizational Unit Name (eg, section)
commonName = Common Name (e.g. server FQDN or YOUR name)
commonName_max = 64
emailAddress = Email Address
emailAddress_max = 64

[v3_ca]
basicConstraints = critical, CA:TRUE
subjectKeyIdentifier = hash
authorityKeyIdentifier = keyid:always, issuer

[smime]
basicConstraints = CA:FALSE
keyUsage = nonRepudiation, digitalSignature, keyEncipherment
extendedKeyUsage = emailProtection
subjectKeyIdentifier = hash
authorityKeyIdentifier = keyid:always, issuer
subjectAltName = email:copy
Next, set the OPENSSL_CONF environment variable to reference the new configuration file. Setting this environment variable eliminates the warning message mentioned earlier. This part is Windows specific. These examples assume OpenSSL is installed in the c:\openssl\ directory and that smime.cnf is saved there as well.
Open a command prompt window, using Run as administrator on Windows. Execute the following command:
set OPENSSL_CONF=c:\openssl\smime.cnfWhen openssl.exe is executed (from the c:\openssl\bin\ directory), there is no warning message and the OpenSSL> prompt is displayed. Type exit to return to the c:\openssl\bin\> prompt.
On Windows, use the following command to launch the Environment Variables dialog box to create, edit, or delete user or system variables if the OPENSSL_CONF environment variable needs to be removed.
rundll32 sysdm.cpl,EditEnvironmentVariablesOn Linux, execute the following command to set the environment variable (assuming smime.cnf is stored in the home path):
export OPENSSL_CONF=~/smime.cnfTo verify the correct path is set, execute the following command:
echo $OPENSSL_CONFNOTE: The remaining steps in this article use Windows-specific paths and conventions, including references to
c:\openssl\andopenssl.exe. On Linux, theopensslcommand is available directly from the terminal without a path prefix, and thesmime.cnffile can be placed anywhere accessible to the user, such as~/smime.cnf. Substitute the chosen path whereverc:\openssl\smime.cnfappears in the commands, including the-extfileargument in Step 7.
Step 3: Generate an RSA Private Key for the Certificate Authority
NOTE: The following steps and OpenSSL commands are executed from the command prompt (on Windows) and not in OpenSSL interactive mode.
This article creates a new certificate authority to sign personal certificates. Execute the following command to generate the RSA private key for the new certificate authority:
NOTE: Ensure all of the following commands are executed from a command prompt window started with
Run as administratoron Windows.
openssl genrsa -aes256 -out ca.key 4096The options specify to use the aes256 encryption cipher and output the results to a file named ca.key with a size of 4096 bits. Note that the corresponding public key is derived from this private key. No extra step or command is required to generate the public key.
The following message is displayed. Follow the prompts to create a pass phrase for this key. Remember this pass phrase for subsequent steps.
Enter PEM pass phrase:
Verifying - Enter PEM pass phrase:
Step 4: Create Self-Signed Certificate for the Certificate Authority
NOTE: If the distribution already has a proper configuration file (as mentioned in Step 2), the
smime.cnffile created earlier is unnecessary, and the last argument must be excluded from the command, i.e., remove-extensions v3_ca.
Execute the following command to generate the new self-signed certificate for the certificate authority:
openssl req -new -x509 -days 3650 -key ca.key -out ca.crt -extensions v3_caThe -x509 option outputs a self-signed certificate instead of a certificate request. The -days 3650 option specifies that the generated certificate is certified for 10 years (ignoring leap years). The -key option specifies the private key to use; the private key ca.key created in Step 3 is used. The self-signed certificate is written to a file named ca.crt using the -out option.
NOTE: The 825-day validity limit enforced by modern mail clients applies to personal certificates, not to a local certificate authority. Since this CA is never submitted to a public trust store, a longer validity period such as
3650days is acceptable here.
Follow the displayed prompts. Use the pass phrase from Step 3. Most fields are left blank by entering a . character. Example entries appear between the brackets following each prompt. Change the values to match the appropriate information.
Do not include the brackets in the entries.
Enter pass phrase for ca.key:
You are about to be asked to enter information that will be incorporated
into your certificate request.
What you are about to enter is what is called a Distinguished Name or a DN.
There are quite a few fields but you can leave some blank
For some fields there will be a default value,
If you enter '.', the field will be left blank.
-----
Country Name (2 letter code) [AU]:[.]
State or Province Name (full name) [Some-State]:[.]
Locality Name (eg, city) []:[.]
Organization Name (eg, company) [Internet Widgits Pty Ltd]:[EXAMPLE COMPANY]
Organizational Unit Name (eg, section) []:[.]
Common Name (e.g. server FQDN or YOUR name) []:[EXAMPLE COMPANY CERTIFICATE AUTHORITY]
Email Address []:[.]
The certificate authority is now ready. The following steps create the personal certificate for a particular e-mail address.
Step 5: Generate an RSA Private Key for the Personal E-mail Certificate
As in Step 3, a new private key is needed. This private key is for the personal certificate rather than the certificate authority. The corresponding public key is derived from this private key. No extra step or command is required to generate the public key.
The example uses a fake person named Aida Bugg with an e-mail address of aida_bugg@example.com who works at EXAMPLE COMPANY (example.com). Change the values to match the appropriate information.
Execute the following command:
openssl genrsa -aes256 -out smime_aida_bugg.key 4096When prompted, enter a pass phrase that is different from the one used in the certificate authority private key.
Enter PEM pass phrase:
Verifying - Enter PEM pass phrase:
Step 5 (Alternate): Generate an ECC Private Key for the Personal E-mail Certificate
NOTE: This article uses RSA to create a private key, but other available cryptographic algorithms can be used to generate a key. The following sequence is purely informational and demonstrates Step 5 using elliptic curve cryptography (ECC) instead.
To get a list of all available curve short names, execute the following command:
openssl ecparam -list_curvesThe output appears similar to the following list (shortened for this comment):
secp112r1 : SECG/WTLS curve over a 112 bit prime field
secp112r2 : SECG curve over a 112 bit prime field
secp128r1 : SECG curve over a 128 bit prime field
secp128r2 : SECG curve over a 128 bit prime field
secp160k1 : SECG curve over a 160 bit prime field
secp160r1 : SECG curve over a 160 bit prime field
secp160r2 : SECG/WTLS curve over a 160 bit prime field
secp192k1 : SECG curve over a 192 bit prime field
secp224k1 : SECG curve over a 224 bit prime field
secp224r1 : NIST/SECG curve over a 224 bit prime field
secp256k1 : SECG curve over a 256 bit prime field
secp384r1 : NIST/SECG curve over a 384 bit prime field
secp521r1 : NIST/SECG curve over a 521 bit prime field
Select an appropriate curve short name from the list and modify/execute the following command.
openssl ecparam -name secp384r1 -genkey -noout -out smime_aida_bugg.keyNOTE: The
openssl ecparam -list_curvesoutput uses SECG short names. If usinggenpkeyinstead, the NIST equivalents for the three curves most commonly used for S/MIME areP-256(forsecp256r1),P-384(forsecp384r1), andP-521(forsecp521r1).
The equivalent genpkey command for the secp384r1 example above is:
openssl genpkey -algorithm EC -pkeyopt ec_paramgen_curve:P-384 -aes256 -out smime_aida_bugg.keyStep 6: Create the Certificate Signing Request
With the personal private key in place, create a certificate signing request. This command is similar to Step 4, but with different options because this is a certificate signing request rather than a self-signed certificate. The request will be signed by the certificate authority in the next step.
Execute the following command:
openssl req -new -key smime_aida_bugg.key -out smime_aida_bugg.csrWhen prompted, enter the pass phrase used to create the private key in Step 5. Most fields are left blank by entering a . character. Example entries appear between the brackets following each prompt.
Do not include the brackets in the entries.
The Common Name used in this step should be different from the one used in Step 4. The challenge password and optional company name fields are left blank.
Enter pass phrase for smime_aida_bugg.key:
You are about to be asked to enter information that will be incorporated
into your certificate request.
What you are about to enter is what is called a Distinguished Name or a DN.
There are quite a few fields but you can leave some blank
For some fields there will be a default value,
If you enter '.', the field will be left blank.
-----
Country Name (2 letter code) [AU]:[.]
State or Province Name (full name) [Some-State]:[.]
Locality Name (eg, city) []:[.]
Organization Name (eg, company) [Internet Widgits Pty Ltd]:[EXAMPLE COMPANY]
Organizational Unit Name (eg, section) []:[.]
Common Name (e.g. server FQDN or YOUR name) []:[Aida Bugg]
Email Address []:[aida_bugg@example.com]
Please enter the following 'extra' attributes
to be sent with your certificate request
A challenge password []:
An optional company name []:
Step 7: Sign the Certificate Using the Certificate Authority
NOTE: If the distribution already has a proper configuration file (as mentioned in Step 2), the
smime.cnffile created earlier is unnecessary, and the last two arguments must be excluded from the command, i.e., remove-extfile c:\openssl\smime.cnf -extensions smime. Confirm that the extensions listed in the[smime]section in the above configuration file exist in the default configuration before removing the last two arguments.
This step creates the personal self-signed certificate. The configuration file created in Step 2 sets the necessary extensions and the certificate authority signs the new personal certificate.
Execute the following command (increment set_serial with each signing request):
NOTE: The CA/Browser Forum’s S/MIME Baseline Requirements, effective September 2023, cap Multipurpose and Strict certificate validity at 825 days (approximately 2 years) for publicly trusted certificate authorities. Some mail clients and OS trust stores may apply this same limit to privately issued certificates as well, so certificates exceeding 825 days risk rejection even outside the public CA ecosystem.
openssl x509 -req -days 825 -in smime_aida_bugg.csr -CA ca.crt -CAkey ca.key -set_serial 1 -out smime_aida_bugg.crt -addtrust emailProtection -addreject clientAuth -addreject serverAuth -trustout -extfile c:\openssl\smime.cnf -extensions smimeWhen prompted, enter the pass phrase for the certificate authority private key from Step 3.
Signature ok
subject=O = EXAMPLE COMPANY, CN = Aida Bugg, emailAddress = aida_bugg@example.com
Getting CA Private Key
Enter pass phrase for ca.key:
NOTE: Repeat Steps 5 through 7 to create certificates for additional e-mail addresses. In Step 7, increment the
set_serialargument (or assign a new unique number) for each additional certificate.
Step 8: Package the Certificate Into the PKCS #12 Format
The certificate is now ready to use for signed and encrypted e-mail. Many e-mail clients need the certificate packaged in a standard format. This step bundles the necessary files into the PKCS #12 format.
Execute the following command:
openssl pkcs12 -export -in smime_aida_bugg.crt -inkey smime_aida_bugg.key -out smime_aida_bugg.p12NOTE: The
-legacyflag may be required for some devices or e-mail clients to recognize the.p12file as valid. For security reasons, this is not recommended as the-legacyflag enables use of deprecated or insecure algorithms.
When prompted, enter the pass phrase associated with the personal private key created in Step 5. Create another pass phrase which is used when importing the .p12 file into an e-mail client.
Enter pass phrase for smime_aida_bugg.key:
Enter Export Password:
Verifying - Enter Export Password:
NOTE: To create a new personal certificate, repeat Steps 5 through 7 with a new key and incremented serial number, then repackage using Step 8. There is no renewal mechanism in OpenSSL; a completely new key pair and certificate are generated each time. Keep the old certificate installed in the mail client even after importing the new one, as it is still needed to decrypt any e-mails that were encrypted using the old public key.
Summary
The self-signed S/MIME certificate is now ready for use. It can be used to send signed e-mails, and recipients can use the public key to send encrypted e-mails in return. Once recipients share their public keys, encrypted e-mail can be sent to them as well.
Common Issues
Missing Key Usages and Extensions
The most common issue is associated with Step 7 where the required key usages are not included in the certificate due to an improper configuration file. If these extensions are not included in the certificate, then the mail client does not accept the certificate for digital signatures or encryption.
To verify that the certificate includes the required extensions, execute the following command:
openssl x509 -in smime_aida_bugg.crt -purpose -noout -textThis command outputs a list of certificate purposes and extensions as well as the public key itself. Verify that the certificate includes the following:
S/MIME signingequalsYes.S/MIME encryptionequalsYes.X509v3 Key UsageequalsDigital Signature, Non Repudiation, Key Encipherment.X509v3 Extended Key UsageequalsE-mail Protection.Trusted UsesequalsE-mail Protection.
Certificate purposes:
SSL client : No
SSL client CA : No
SSL server : No
SSL server CA : No
Netscape SSL server : No
Netscape SSL server CA : No
S/MIME signing : Yes
S/MIME signing CA : No
S/MIME encryption : Yes
S/MIME encryption CA : No
CRL signing : No
CRL signing CA : No
Any Purpose : Yes
Any Purpose CA : Yes
OCSP helper : Yes
OCSP helper CA : No
Time Stamp signing : No
Time Stamp signing CA : No
Certificate:
    Data:
        Version: 3 (0x2)
        Serial Number: 1 (0x1)
        Signature Algorithm: sha256WithRSAEncryption
        Issuer: O = EXAMPLE COMPANY, CN = EXAMPLE COMPANY CERTIFICATE AUTHORITY
        Validity
            Not Before: May 17 19:20:33 2022 GMT
            Not After : Aug 19 19:20:33 2024 GMT
        Subject: O = EXAMPLE COMPANY, CN = Aida Bugg, emailAddress = aida_bugg@example.com
        Subject Public Key Info:
            Public Key Algorithm: rsaEncryption
                RSA Public-Key: (4096 bit)
                Modulus:
                Exponent: 65537 (0x10001)
        X509v3 extensions:
            X509v3 Basic Constraints:
                CA:FALSE
            X509v3 Key Usage:
                Digital Signature, Non Repudiation, Key Encipherment
            X509v3 Extended Key Usage:
                E-mail Protection
            X509v3 Subject Key Identifier:
            X509v3 Authority Key Identifier:
                keyid:

            X509v3 Subject Alternative Name:
                email:aida_bugg@example.com
    Signature Algorithm: sha256WithRSAEncryption
Trusted Uses:
  E-mail Protection
Rejected Uses:
  TLS Web Client Authentication, TLS Web Server Authentication
Certificate Authority Trust
Since these are self-signed certificates rather than certificates from a well-known certificate authority, no operating system or mail client recognizes nor trusts the certificate authority by default. The certificate authority must be added to the operating system or mail client trust store before any personal certificates signed by that certificate authority are recognized and trusted as valid. Paying a well-known provider for a certificate avoids this administrative step, at the cost of relying on an external party.