How to Create a Multi-Resolution favicon.ico File
Creating a proper favicon.ico file is one of those small details that makes a website feel polished. For years, my understanding of favicons was outdated. I first learned about them more than 20 years ago when they were introduced in early versions of Internet Explorer. Back then, a favicon was just a 16×16 pixel image limited to 256 colors.
I revisited the topic recently because the favicon on my website was not displaying in Bing search results, even though I had a 16×16 favicon and additional icon images defined in the HTML <head> using <link rel="icon">. One likely explanation is that Bing now expects a multi-resolution .ico file rather than a single small image.
Modern websites can provide favicon images in several formats and sizes. A multi-resolution favicon.ico is one practical way to provide several raster sizes in a single file, allowing browsers and operating systems to select an appropriate image for different contexts.
This article walks through how to export multiple PNG sizes from a vector design in Inkscape and combine them into a multi-resolution favicon.ico using ImageMagick.
Why Use a Multi-Size Favicon
Favicons appear in more places than browser tabs. They show up in bookmarks, pinned tabs, taskbars, desktop shortcuts, and search results. Each of these contexts may use a different size.
Different contexts may use different icon sizes. Common raster sizes include 16×16, 32×32, and 48×48, while larger sizes can be useful for high-DPI displays and other contexts.
A properly built .ico file can contain multiple resolutions. The browser or operating system selects the closest match. This prevents scaling artifacts and keeps the icon sharp everywhere it appears.
Instructions
Step 1: Design the Icon in Inkscape
If Inkscape is not already installed, download and install it from the official Inkscape website.
Inkscape is ideal for favicon design because it is vector-based. Vector graphics scale cleanly without losing quality. This means the icon can be designed once and exported at any size.
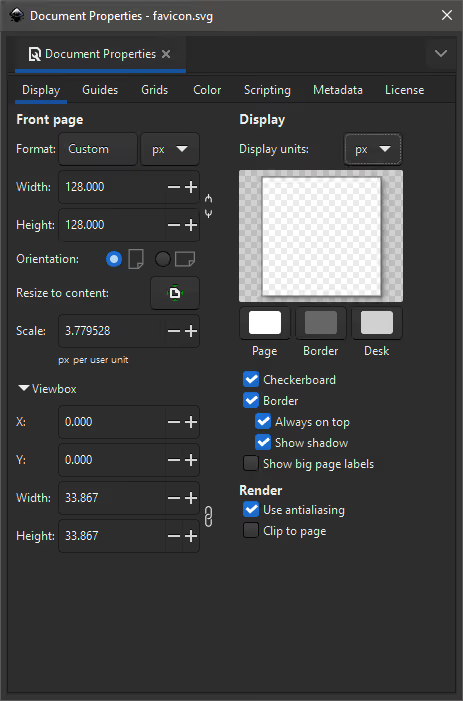
Set Up the Document
- Open Inkscape.
- From the
Filemenu, selectDocument Properties. - On the
Displaytab:- Set
Formattopx(pixels). - Optionally enable a
Checkerboardbackground. - Set the canvas width and height to a large square size, such as 512×512 pixels.
- Set
Designing at a high resolution makes it easier to maintain clarity when exporting smaller versions.
Design Tips
Favicons are extremely small. At this size, clarity takes priority over detail.
Keep the design simple and bold. Use strong contrast. Avoid thin lines and intricate shapes that disappear at smaller sizes.
Periodically zoom out to 16×16 while designing. For some designs, the 16×16 version may need to be simplified rather than simply downscaled. Small details that look good at 512×512 can become indistinguishable at 16×16.
Step 2: Export Multiple PNG Sizes
Once the design is ready, export multiple PNG versions.
- In Inkscape, from the
Filemenu, selectExport.... - On the
Single Filetab:- Select
Page. - Set
WidthandHeight. - Set the export file name (for example,
favicon-512x512.png). - Click
Export.
- Select
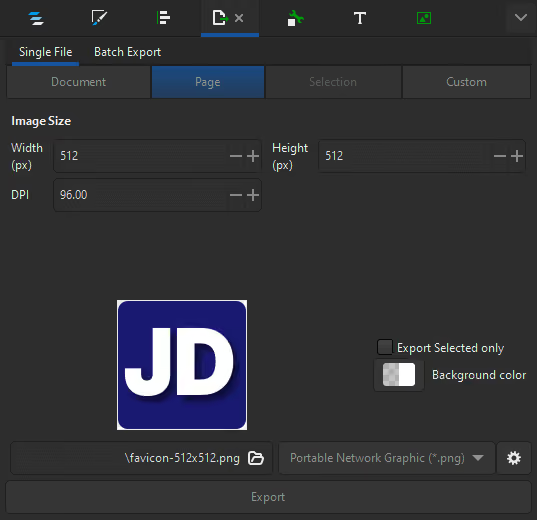
Export the image and repeat the process for each required size.
At a minimum, export:
- 16×16
- 32×32
- 48×48
All exported images should come from the same vector source to ensure consistency.
Step 3: Install ImageMagick
To combine the PNG files into a single .ico file, download and install ImageMagick from the official website.
ImageMagick is a command-line image processing tool that can package multiple PNG images into one multi-resolution favicon file.
Step 4: Combine PNGs Into favicon.ico
Open a terminal or command prompt in the folder containing the exported PNG files.
Run:
magick favicon-16x16.png favicon-32x32.png favicon-48x48.png favicon.icoFor older versions of ImageMagick, use:
convert favicon-16x16.png favicon-32x32.png favicon-48x48.png favicon.icoThis command creates a single favicon.ico file that contains all specified resolutions.
Optional: Verify the ICO File
To confirm the file contains multiple resolutions, run:
magick identify favicon.icoThe output should list each embedded image size.
favicon.ico[0] ICO 16x16 16x16+0+0 8-bit sRGB 0.001u 0:00.000
favicon.ico[1] ICO 32x32 32x32+0+0 8-bit sRGB 0.004u 0:00.004
favicon.ico[2] ICO 48x48 48x48+0+0 8-bit sRGB 7406B 0.006u 0:00.005
Alternative Method: Single-Command
ImageMagick can also generate a multi-resolution .ico file directly from one source image, without manually exporting each PNG size first.
Run:
magick favicon-512x512.png -define icon:auto-resize=16,32,48 favicon.icoThis resizes the source image to each listed dimension and embeds all of them in a single favicon.ico. It produces the same type of multi-resolution file as the manual PNG export in Steps 2 through 4, with fewer steps.
The manual export workflow is still useful when a design needs adjustment at specific sizes, such as simplifying details that do not read well at 16×16. For a source image that is already optimized across sizes, icon:auto-resize is faster.
Step 5: Add the Favicon to the Website
Place favicon.ico in the website’s root directory:
/favicon.icoThen add this line inside the <head> section of the HTML:
<link rel="icon" href="/favicon.ico" type="image/x-icon">Explicitly linking to the favicon makes the intended resource clear and avoids relying on automatic /favicon.ico discovery.
Why This Workflow Is Better
Online favicon generators are convenient, but they may compress images unpredictably or create unnecessary variations. By designing in Inkscape and packaging with ImageMagick, direct control is maintained over the source artwork, exported sizes, and final ICO contents.
The process is scriptable and easy to repeat. If branding changes, every required size can be regenerated in minutes.
Summary
After publishing the multi-resolution favicon.ico, the favicon began appearing correctly in Bing search results. Although this does not establish that Bing specifically requires multiple resolutions, the change resolved the issue in my case.
favicon.ico with multiple resolutions is a flexible way to support different display sizes. Using Inkscape and ImageMagick provides direct control over the process.