Rename SharePoint Files in Power Automate Using REST API
Renaming an existing file in a SharePoint document library is more complex than it first appears when using Power Automate. While many SharePoint updates can be handled with standard actions, changing a file’s actual name requires updating both the FileLeafRef (file name) and Title (display name) fields directly on the underlying list item.
Power Automate does not provide a native action for renaming files. Instead, you must use the Send an HTTP request to SharePoint action to call the SharePoint REST API and issue a PATCH or MERGE request to the list item endpoint. This approach requires understanding SharePoint internal field names, REST endpoints, headers, and content types.
Although this method is more advanced, it ensures the file’s ID, version history, permissions, and links remain intact. Deleting and recreating a file, even with the same name, creates a new item ID, which can break downstream dependencies.
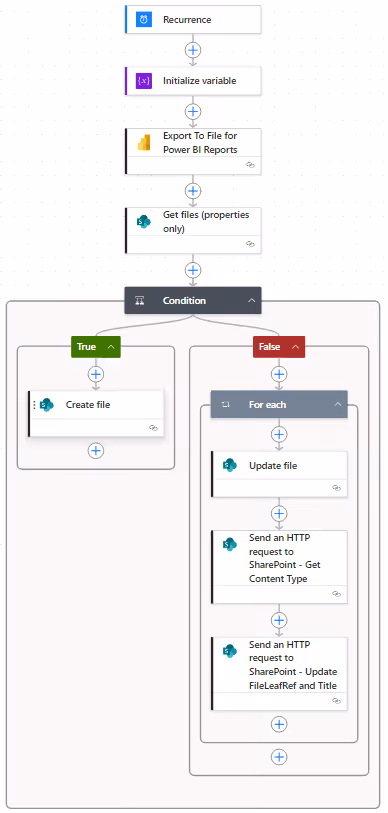
In this article, you’ll learn a step-by-step Power Automate workflow that exports a PNG image of a Power BI report and uploads it to a SharePoint library. The flow includes logic to create the file if it doesn’t exist or update it if it does. Afterward, the flow renames both the file name and title with a timestamp suffix, clearly marking when the snapshot was generated. This workflow demonstrates how REST-based updates fit naturally into automated reporting and document lifecycle management.
Why a REST API Call Is Required
Power Automate’s standard Update file and Update file properties actions can only modify editable metadata fields. The actual file name is stored in the system-managed FileLeafRef field, which represents a file system operation rather than simple metadata. To safely rename a file while preserving its item ID, version history, permissions, and existing links, SharePoint requires an explicit REST API request to the list item endpoint. This is why the Send an HTTP request to SharePoint action is necessary for renaming files in place.
Instructions
Step 1: Create a New Scheduled Cloud Flow
- In Power Automate, select
Createand chooseScheduled cloud flowfrom theStart from blanksection. - In the
Build a scheduled cloud flowdialog, enter theFlow name, starting date and time, and setRepeatto every1Day. - Click the
Createbutton to generate the flow.
The flow is created with a daily recurrence trigger.

Step 2: Initialize Timestamp Variable
Create a variable named vTimestamp to store a formatted timestamp used as a suffix for the file name and display name in subsequent steps.
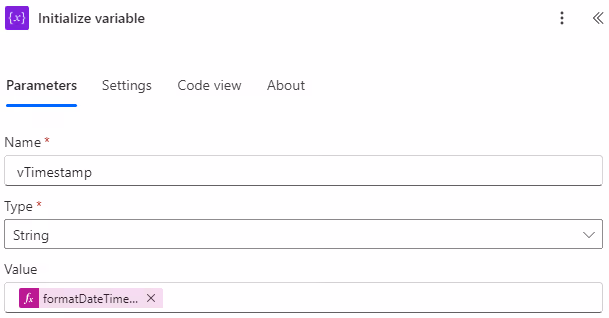
Use the following expression for the Value field:
formatDateTime(utcNow(), 'yyyy_MM_dd_HH_mm_ss')
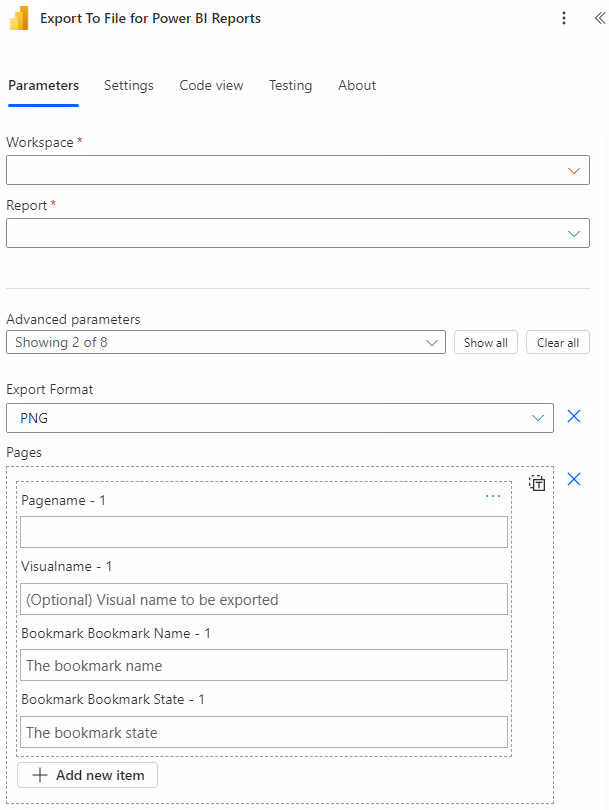
Step 3: Get Updated File Content
For demonstration purposes, this step generates updated file content using Power BI. You can replace it with any content source required for your scenario.
Add an Export to File for Power BI Reports action and configure it to export a report from the appropriate workspace in PNG format.
Step 4: Find the File in SharePoint
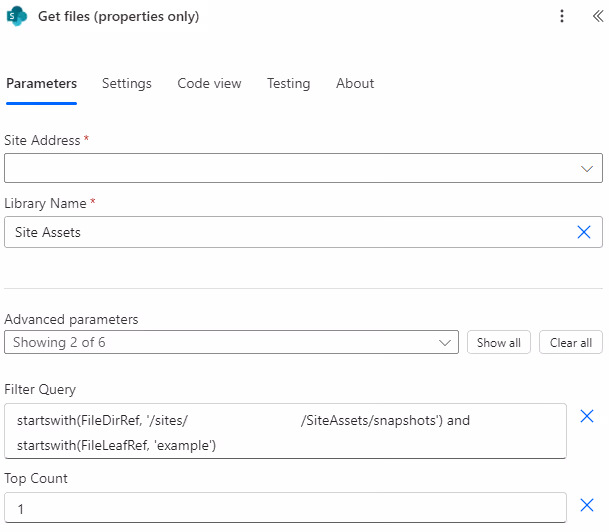
Add a Get files (properties only) action to query the SharePoint document library. In this example, the file is named example.png and stored in the Site Assets library under a snapshots folder.
Use an OData filter query to locate the file by filtering on:
FileDirRef(folder path)FileLeafRef(file name)
Set Top Count to 1 to return a single result.
Step 5: Check If the File Exists
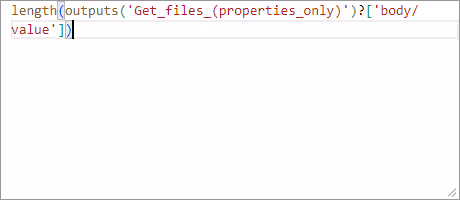
Add a Condition to determine whether the file was found.
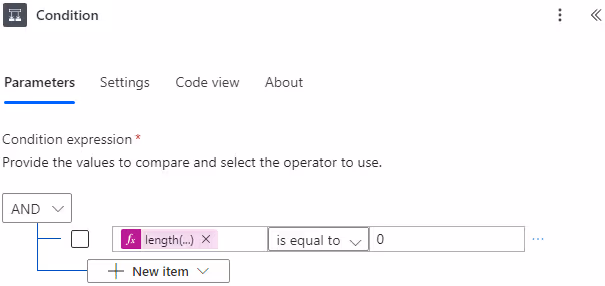
Use the following expression:
length(outputs('Get_files_(properties_only)')?['body/value'])If the result is 0, the file does not exist. Otherwise, it does.
Step 6: Create the File If It Does Not Exist
If the file does not exist, add a Create file action.
Set File Content to:
body('Export_To_File_for_Power_BI_Reports')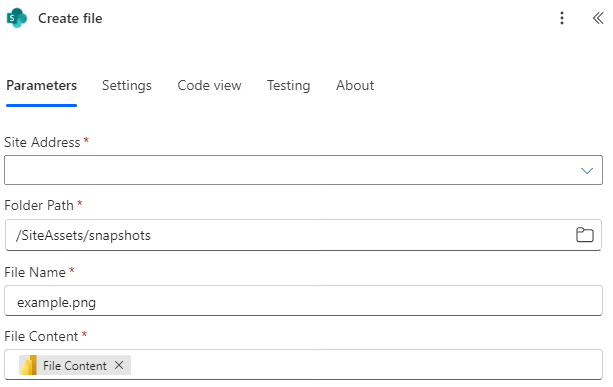
Step 7: Process the Existing File
If the file exists, add a For each loop. Even though only one file is returned, Power Automate requires a loop.
Set the loop input to:
outputs('Get_files_(properties_only)')?['body/value']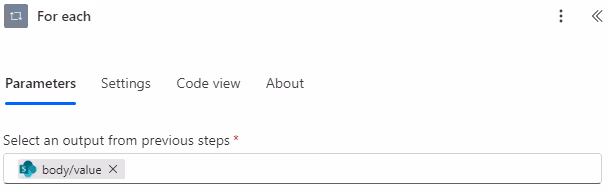
Step 8: Update the File Contents
Add an Update file action to replace the existing file content.
- Set
File Identifierto:
items('For_each')?['{Identifier}']- Set
File Contentto:
body('Export_To_File_for_Power_BI_Reports')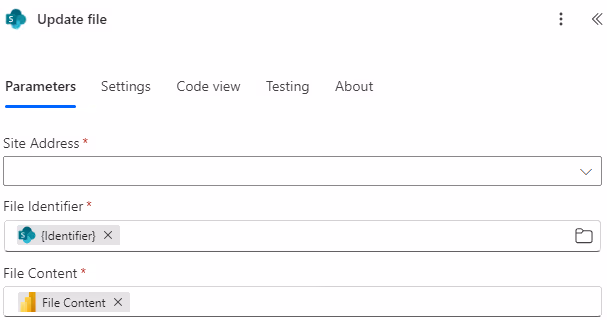
Step 9: Get the Document Library Content Type
To update the file name and display name, you must know the SharePoint list item content type. This is not the MIME type (e.g., image/png), but rather the SharePoint content type for the document library.
Add a Send an HTTP request to SharePoint action inside the loop.
- Set the
Methodfield toGET. - In the
Urifield, specify the endpoint as follows:
_api/web/lists/GetByTitle('Site Assets')- In the
Advanced parameterssection, addHeadersand specifyContent-Typeas follows:
application/json; odata=verbose; charset=utf-8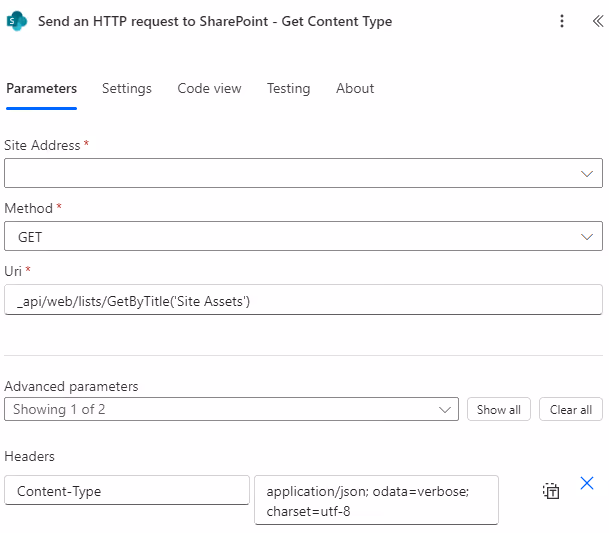
Step 10: Update SharePoint File Name and Title
Add another Send an HTTP request to SharePoint action inside the loop.
- Set the
Methodfield toPOST. - In the
Urifield, specify the endpoint as follows:
_api/lists/GetByTitle('Site Assets')/Items(ID)Where ID is:
items('For_each')?['ID']- In the
Advanced parameterssection, add bothHeadersandBody.
For Headers, add the following key and value pairs:
Content-Type: application/json; odata=verbose; charset=utf-8
IF-MATCH: *
X-HTTP-METHOD: PATCH
For Body, set it as follows:
{
   '__metadata':{
      'type':'d.ListItemEntityTypeFullName'
   },
   'FileLeafRef':'example_vTimestamp.png',
   'Title':'example_vTimestamp.png'
}
Replacing d.ListItemEntityTypeFullName with the expression:
body('Send_an_HTTP_request_to_SharePoint_-_Get_Content_Type')?['d']?['ListItemEntityTypeFullName']Replace both references to vTimestamp with the expression:
variables('vTimestamp')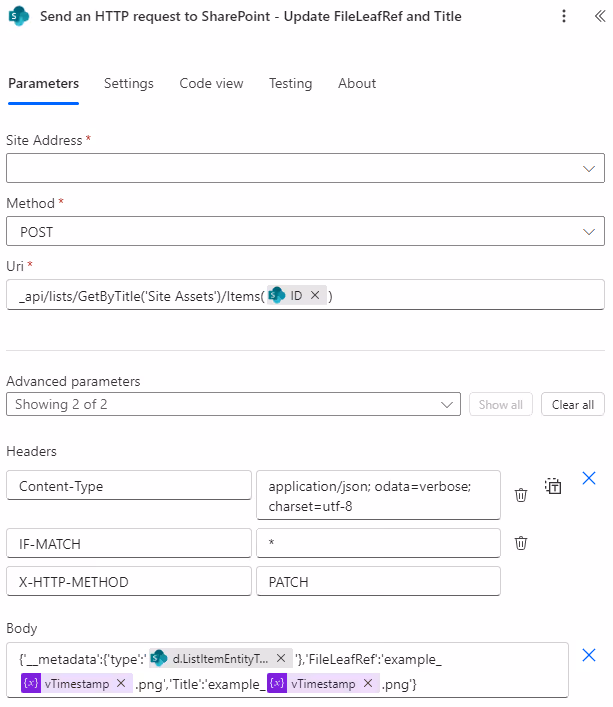
Results
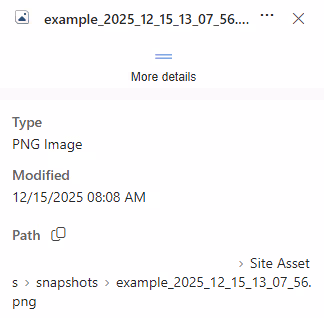
On the first execution, the file does not exist and is created as example.png.

On subsequent executions, the existing file is updated and renamed to include the timestamp suffix in both the file name and display name.

Summary
Renaming SharePoint files in Power Automate requires using the REST API because the file name is a protected system field. While more complex, this approach preserves the file’s ID, history, and links. Combining standard Power Automate actions with REST calls creates reliable, production-ready workflows for automated reporting and document management.