How to Delete SharePoint List Items Using Power Automate (3 Methods Compared)
Deleting SharePoint items in Power Automate is straightforward when working with small datasets, but the approach that works fine at a hundred records can become a reliability and throughput problem at ten thousand. The method you choose affects not just speed, but how SharePoint handles throttling, whether deleted items are recoverable, and how much operational complexity the flow introduces as it scales.
This article compares three production-ready deletion methods:
- The standard
Delete itemaction. - SharePoint REST API.
- SharePoint Batch API.
Each one is valid, but they behave differently under load and carry different trade-offs around recovery, throughput, and implementation complexity.
Scenario Overview
A typical deletion flow is triggered on a schedule. It retrieves a filtered set of items from a SharePoint list, then processes each one for removal. The trigger is almost always recurrence-based rather than item-based, since deletion is usually a maintenance operation rather than a response to a specific item event.
The structure of the flow is roughly the same across all three methods: retrieve, loop, delete. What changes is how the deletion step is executed, and that difference has meaningful consequences at scale.
Before choosing a method, it helps to understand the three behavioral factors that matter most in production environments: throttling, recycle bin recovery, and silent batch failures.
Throttling
Throttling is SharePoint’s built-in service protection mechanism. When a flow issues too many requests in a short period, SharePoint responds with HTTP 429 errors and Power Automate introduces automatic retry delays.
At small scale, throttling is rarely noticeable. At higher volume, it becomes the dominant factor affecting flow duration. This is especially relevant for deletion methods that issue one HTTP request per item.
Recycle Bin Recovery
Recycle bin behavior varies significantly by deletion method.
The Delete item action routes items through SharePoint’s normal recycle bin lifecycle, preserving both first-stage and second-stage recovery.
The REST API and Batch API can either permanently delete items or route them to the recycle bin depending on which endpoint is used. In practice, these methods are commonly used for permanent deletion scenarios, but they are not inherently irreversible.
Silent Batch Failures
The SharePoint Batch API returns HTTP 200 even when individual operations inside the batch fail. Power Automate therefore treats the HTTP request itself as successful unless the response body is inspected manually.
This behavior is one of the most important operational differences between the Batch API and the other deletion methods.
Choosing the Right Method
The right choice depends on three things:
- How many items are you deleting?
- Is item recovery necessary?
- How much implementation complexity are you willing to manage?
The Delete item action is the right starting point for most scenarios. It is simple to implement, integrates cleanly with SharePoint’s native lifecycle, and preserves recycle bin recovery. The trade-off is that each deletion generates an individual request, which makes throttling increasingly significant as volume grows.
The REST API gives you more direct control over request handling and logging while supporting either permanent deletion or recycle bin routing depending on the endpoint used. Throughput characteristics are generally similar to the Delete item action because each item still requires its own request.
The Batch API becomes valuable when request volume itself is the bottleneck. By grouping many delete operations into a single HTTP request, it significantly reduces request pressure and improves throughput at scale. The trade-off is implementation complexity: batch formatting is strict, debugging is harder, and failures must be validated manually from the response body.
| Delete Item Action | REST API | Batch API | |
|---|---|---|---|
| Recycle bin recovery | Yes, both stages | Optional via endpoint | Optional via endpoint |
| Implementation complexity | Low | Medium | High |
| Throttling impact at scale | High | High | Much lower |
| Silent batch failures | No | No | Yes |
| Transactional (all or nothing) | No | No | No |
| Best for | General use, recoverable deletions | Explicit HTTP control and logging | High-volume deletion |
| Typical practical volume per run | ~500-1000 items | ~500-1000 items | 1000+ items |
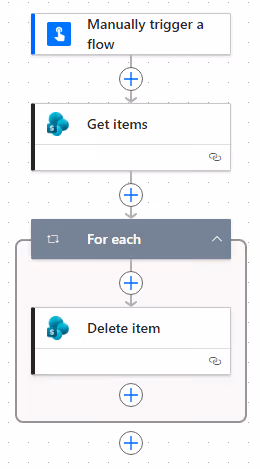
Method 1: Delete Items Using the Delete Item Action
Implementation
Start by creating a Scheduled cloud flow. Set the recurrence to match how often the deletion should run, typically daily or weekly for maintenance scenarios. In this example, an Instant cloud flow is used instead so that it can be triggered manually as needed.
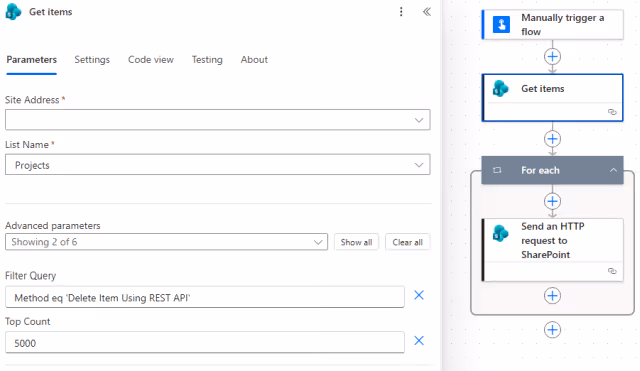
Add a Get items action and configure it against your SharePoint site and list. Under Advanced parameters, apply a Filter Query using OData syntax to limit results to only the records you intend to delete. Retrieving the entire list and filtering inside the loop is a common mistake that increases request volume unnecessarily.
In this example, the list contains a Method column used to flag items for a specific deletion strategy. The filter targets items where that column equals Delete Item:
Method eq 'Delete Item'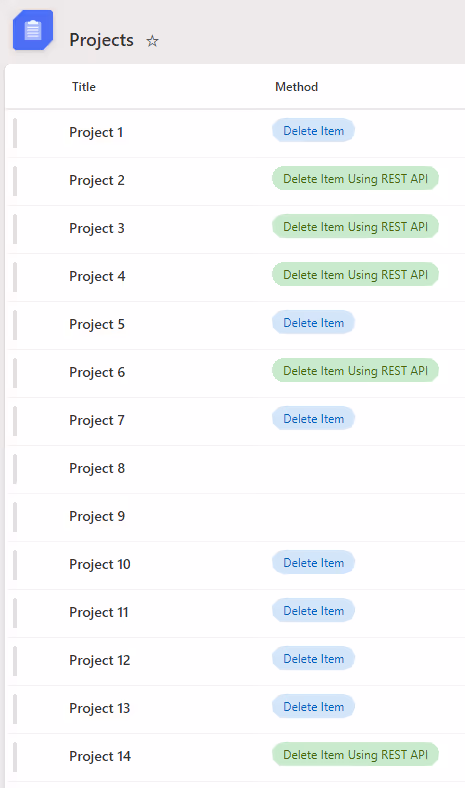
Set the Top Count field to control how many items are retrieved per run.
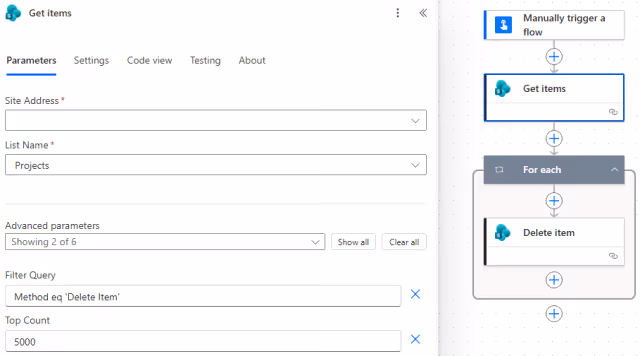
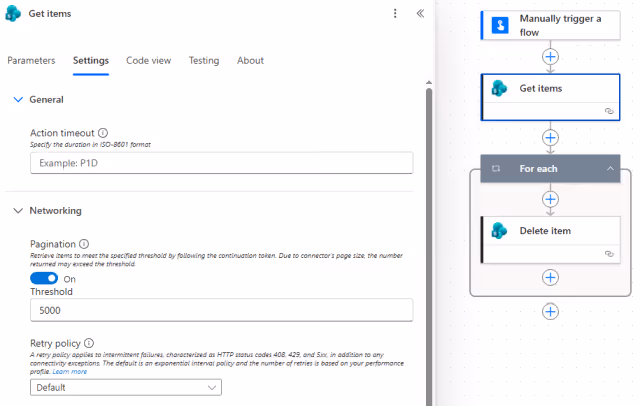
Under Settings, enable Pagination and set the Threshold to 5000.
Add an Apply to each (For each) action using the value output from Get items.
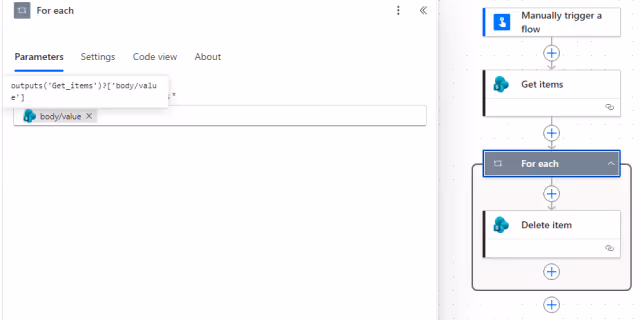
Inside the loop, add the Delete item action and map the Id field using:
@{items('For_each')['ID']}
SharePoint Behavior and Recycle Bin Recovery
This method follows SharePoint’s standard deletion lifecycle.
Deleted items move to the site’s first-stage recycle bin, where they can typically be restored by the deleting user or site administrators. If removed from there, they move to the second-stage recycle bin, where a site collection administrator can still restore them before permanent removal.
If there is any realistic chance that a deletion might need to be reversed, this is the safest method.
Performance and Throttling
Each Delete item call generates a separate request to SharePoint. At low volume this is rarely a problem, but as the number of items increases, throttling delays become increasingly noticeable.
A flow deleting several hundred items may complete quickly, while the same flow deleting several thousand items may slow substantially once SharePoint begins issuing HTTP 429 responses and Power Automate introduces retry delays.
If throttling causes the flow to exceed its schedule window, reducing Top Count and running the flow more frequently is usually more reliable than attempting larger deletion runs.
Concurrency Considerations
Apply to each supports configurable concurrency in Power Automate settings. Enabling concurrency allows multiple delete operations to execute in parallel, which can improve throughput for moderate workloads.
However, higher concurrency also increases request pressure against SharePoint and can accelerate throttling under heavy load. It may also increase the likelihood of race conditions when multiple flows interact with the same list simultaneously.
For deletion-heavy flows, concurrency settings should be treated as a throughput tuning mechanism rather than a guaranteed performance improvement.
Method 2: Delete Items Using the SharePoint REST API
Implementation
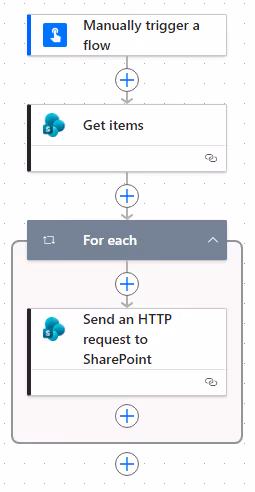
The overall flow structure remains the same as Method 1: trigger, Get items, loop, delete.
The difference is that the Delete item action is replaced with Send an HTTP request to SharePoint.
In this example, the list is filtered for items where the Method column equals Delete Item Using REST API:
Method eq 'Delete Item Using REST API'The Get items configuration for Top Count and Settings for Pagination are otherwise the same as Method 1.
Configure the Send an HTTP request to SharePoint action as follows:
Site Address: Match the value fromGet items.Method:POST.
NOTE: Using
POSTinstead ofDELETEmay look counterintuitive. SharePoint’s REST API usesPOSTas the base method for operations that modify data, with theX-HTTP-Methodheader overriding the operation type.Some corporate firewalls and proxies also block the literal
DELETEverb, makingPOSTwithX-HTTP-Methodthe more reliable approach in enterprise environments.
Set Uri to:
_api/web/lists/GetByTitle('YourListName')/items(@{items('For_each')['ID']})Replace YourListName with your actual list display name. If the name contains spaces, include them as written:
GetByTitle('My Task List')
To send deleted items to the recycle bin instead of permanently deleting them, use:
_api/web/lists/GetByTitle('YourListName')/items(@{items('For_each')['ID']})/recycle()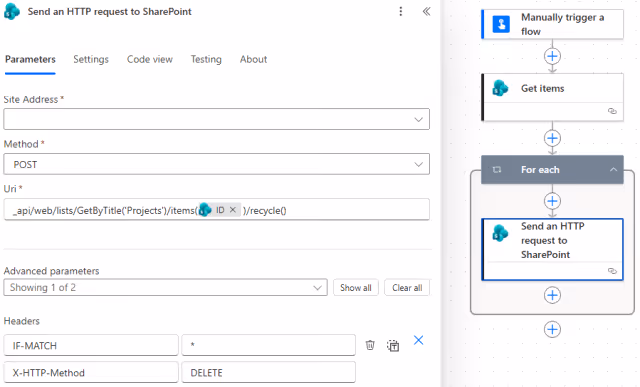
Under Advanced parameters, add these headers:
IF-MATCH: *
X-HTTP-Method: DELETE
The IF-MATCH header bypasses ETag version checks. Without it, SharePoint returns HTTP 412 Precondition Failed.
Leave the Body empty.
SharePoint Behavior and Recycle Bin Recovery
The REST API supports both permanent deletion and recycle bin routing depending on the endpoint used.
Using the standard delete endpoint bypasses the normal recycle-bin-first behavior and permanently deletes the item. Using the /recycle() endpoint routes the item through SharePoint’s recycle bin lifecycle instead.
Microsoft Purview retention policies or other compliance configurations can override either behavior depending on tenant governance settings. If deletion behavior is compliance-sensitive, verify the actual outcome in your environment rather than assuming the API endpoint alone determines retention.
Performance and Throttling
The REST API does not significantly improve throughput compared to the Delete item action because each deletion still requires an individual HTTP request.
Its primary advantage is control. You gain direct access to request and response details, which simplifies custom logging and error handling.
For example, to log failures, add a Compose action after the HTTP request and capture:
outputs('Send_an_HTTP_request_to_SharePoint')?['statusCode']Method 3: Bulk Deletion Using the SharePoint Batch API
The SharePoint Batch API allows multiple operations to be sent in a single HTTP request. Instead of one request per item, a single batch can contain many delete operations grouped together.
The primary advantage is reduced request pressure. SharePoint processes the batched operations internally after receiving a single HTTP request, significantly reducing network round trips and request overhead.
The trade-off is complexity. Batch formatting is strict, debugging is harder, and failures must be validated from the response body rather than the HTTP status code alone.
Important Batch API Behaviors
Before implementing batch deletion, several operational characteristics are important to understand:
- Batch operations are not transactional. A failed delete does not roll back the remaining operations.
- The batch endpoint itself returns HTTP 200 even when individual operations fail internally.
- Formatting errors are unforgiving. Missing boundaries, missing blank lines, or incorrect line endings can invalidate the request.
These behaviors make the Batch API powerful, but also significantly less forgiving than the other deletion methods.
Implementation
The flow structure still begins with a trigger, Get items, and a processing loop.
The key difference is that the loop builds batches of delete operations rather than issuing one request per item.

Step 1: Initialize Flow Variables
Add four Initialize variable actions:
iBatchSizeofTypeIntegerwith initialValueof250.iBatchOffsetofTypeIntegerwith initialValueof0.strBatchGUIDofTypeStringwith initialValueofnull.strChangesetGUIDofTypeStringwith initialValueofnull.
The batch size controls how many delete operations are included in each batch request. The final batch may contain fewer items if the remaining item count is smaller than the configured size.
A batch size of 250 is a stable starting point for most environments. Larger batches reduce request overhead further but increase debugging difficulty if failures occur.
Step 2: Retrieve SharePoint List Items
Add a Get items action to retrieve the items from the SharePoint list.
- Under
Advanced parameters, set aFilter Queryappropriate to your scenario. - Set
Top Countto match your expected volume (5000in this example). - Under
Settings, enablePaginationand set theThresholdto match yourTop Count(5000).
Step 3: Add a Do Until Loop
Power Automate does not have a native chunk or slice action, so processing the Get items results in batches requires index-based slicing inside a Do until loop.
Add a Do until control. Set the Loop until condition to:
@{greaterOrEquals(variables('iBatchOffset'), length(outputs('Get_items')?['body/value']))}Each iteration processes the next chunk of items until the entire result set has been covered.
If Get items returns an empty result set, body/value will be an empty array and length() will return 0. The loop exits immediately without error.
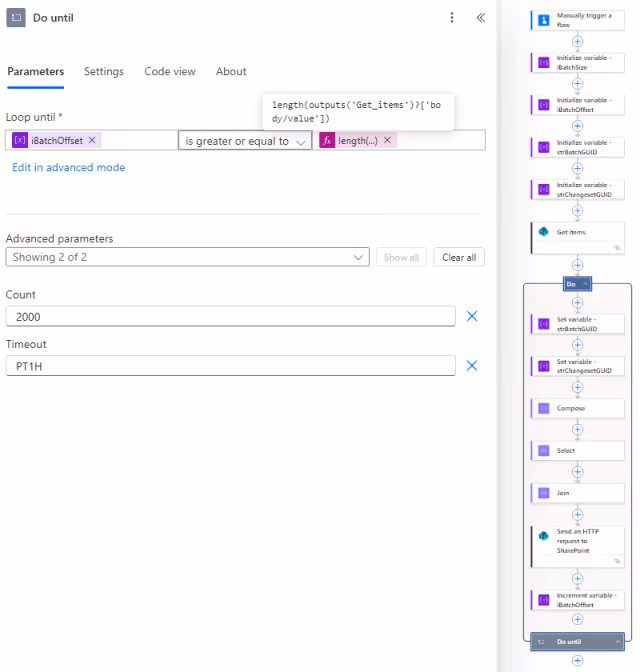
Important Do Until Settings
By default, a Do until loop stops after:
60iterations.- Or one hour of execution time in ISO 8601 duration format (
PT1H).
These defaults can become a problem for high-volume batch deletion flows.
For example, a batch size of 250 with 20000 items requires 80 loop iterations.
Without adjusting the loop settings, the flow would terminate before completing the full dataset.
Open the Do until Parameters panel and adjust Count and Timeout based on your expected volume and execution time.
Step 4: Generate GUIDs
Each batch request requires two unique identifiers: one for the outer batch boundary and one for the inner changeset boundary.
Generate fresh GUIDs at the start of each loop iteration.
Inside the loop, add two Set variable actions:
- Set
strBatchGUIDtoValueof@{guid()}. - Set
strChangesetGUIDtoValueof@{guid()}.
Using a new GUID per iteration ensures that batch responses can be correlated to their source iteration during debugging. Reusing GUIDs across iterations can cause parsing failures or make it difficult to identify which iteration produced a given response.
Step 5: Build the Batch Payload
Each item in the batch body must be wrapped in changeset boundaries.
Add a Compose action and enter the following in the Inputs field:
--changeset_@{variables('strChangesetGUID')}
Content-Type: application/http
Content-Transfer-Encoding: binary

DELETE https://YourSharePoint/sites/YourSite/_api/web/lists/GetByTitle('YourListName')/items(#ID#) HTTP/1.1
IF-MATCH: *
Replace YourSharePoint, YourSite, and YourListName with your actual values.
NOTE: The SharePoint
$batchendpoint is strict about formatting. The blank line afterIF-MATCH: *is required by the multipart MIME format. Missing it is one of the most common causes of batch failures.
To route deletions to the recycle bin instead of permanently deleting items, use:
DELETE https://YourSharePoint/sites/YourSite/_api/web/lists/GetByTitle('YourListName')/items(#ID#)/recycle() HTTP/1.1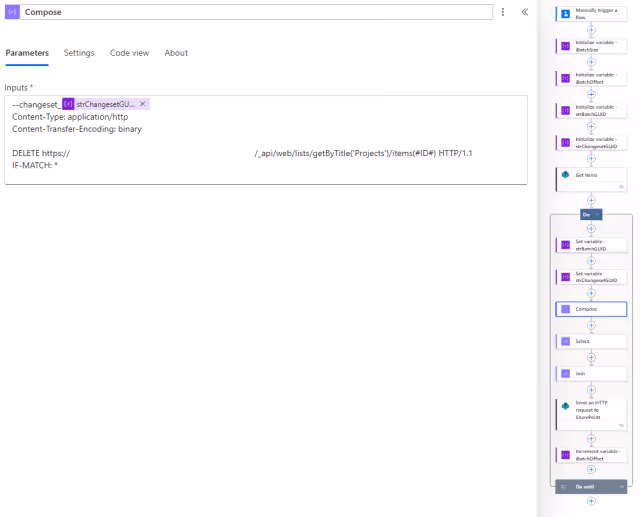
Build Delete Blocks Using Select
Next, add a Select action and switch to Text Mode.
In the From field, enter the following expression:
take(skip(outputs('Get_items')?['body/value'],variables('iBatchOffset')),variables('iBatchSize'))This expression slices the Get items result set starting at the current offset and taking up to the configured batch size.
In the Map field, enter the following expression:
replace(outputs('Compose'),'#ID#',string(item()?['ID']))The Map expression runs once per item in the slice. outputs('Compose') pulls in the full delete block template built above. string(item()?['ID']) extracts the SharePoint item ID from the current element and converts it to a string, which replace() requires on both sides. #ID# was chosen as the placeholder specifically because it won’t appear anywhere else in the template, making the substitution unambiguous. The result is one fully formatted delete block per item with the real item ID in place.
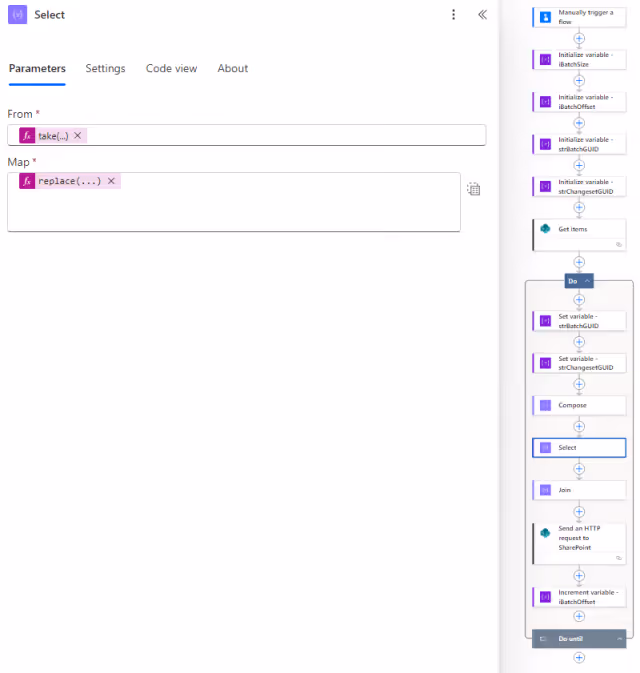
Why Select Is Used Instead of Apply to Each
Using Select here is important. It allows the flow to build all delete operation blocks in-memory as a single array transformation rather than executing one HTTP request per item inside Apply to each, which would largely eliminate the throughput advantage of batching.
The result is one fully formatted delete block per item.
Example:
--changeset_<guid>
Content-Type: application/http
Content-Transfer-Encoding: binary

DELETE https://YourSharePoint/sites/YourSite/_api/web/lists/GetByTitle('YourListName')/items(42) HTTP/1.1
IF-MATCH: *
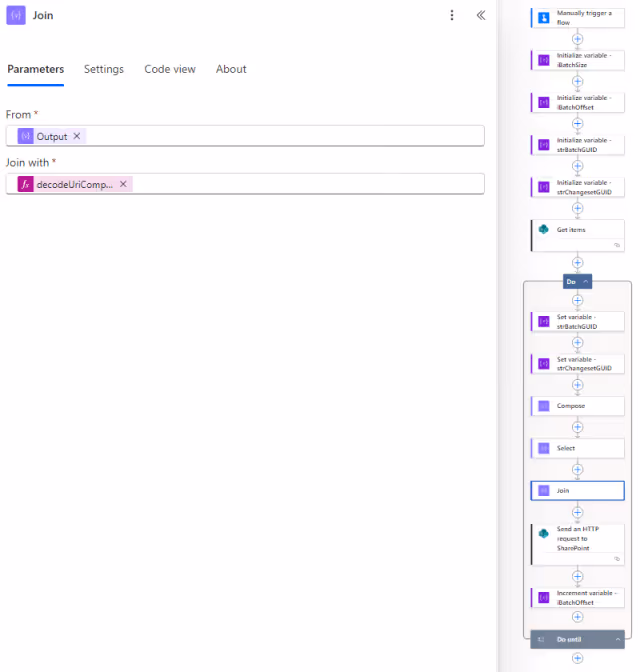
Join the Delete Blocks
Now, add a Join action to the loop.
In the From field, enter the expression:
body('Select')In the Join with field, enter the expression:
decodeUriComponent('%0A')This concatenates all generated delete blocks into the single string that will be inserted into the batch body.
NOTE: The batch endpoint expects
CRLF(\r\n) line endings per the OData specification. In practice, SharePoint Online usually acceptsLF(\n) line endings as used here. However, if you encounter persistent formatting-related failures, switching theJoindelimiter todecodeUriComponent('%0D%0A')is a good first troubleshooting step.
Step 6: Send the Batch Request
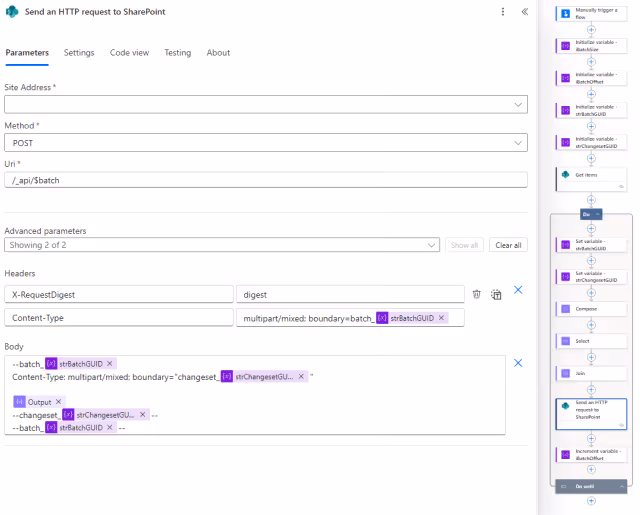
Add a Send an HTTP request to SharePoint action.
- Set the
Site Addressto your SharePoint site URL. - Set the
MethodtoPOST. - Set the
Urito_api/$batch.
Under Advanced parameters, add Headers and Body.
In the Headers section, add two headers:
X-RequestDigest: digestThe value digest is a literal string recognized by the Send an HTTP request to SharePoint connector. The connector replaces it automatically with a valid request digest at runtime. You do not need to retrieve or supply a digest value manually.
Content-Type: multipart/mixed; boundary=batch_@{variables('strBatchGUID')}In the Body field, enter:
--batch_@{variables('strBatchGUID')}
Content-Type: multipart/mixed; boundary="changeset_@{variables('strChangesetGUID')}"

@{body('Join')}
--changeset_@{variables('strChangesetGUID')}--
--batch_@{variables('strBatchGUID')}--
The boundary names in the Content-Type header must exactly match the boundary markers used in the body.
Step 7: Validate the Batch Response
The batch endpoint itself returns HTTP 200 regardless of whether individual operations succeeded.
Successful delete operations return HTTP 204 within the multipart response body. Failed operations typically return HTTP 500 responses embedded inside the same response payload.
Common causes include:
- Item already deleted.
- Permission failures.
- Concurrent list operations.
Add a Compose action (named Compose Response) after the Send an HTTP request to SharePoint action to capture the response body:
body('Send_an_HTTP_request_to_SharePoint')Then add a Condition to check for failures:
contains(outputs('Compose_Response'), '500')If true, terminate the flow or log the failure based on your requirements.
Without explicit response validation, Power Automate run history may report the flow as successful even when many operations failed internally.
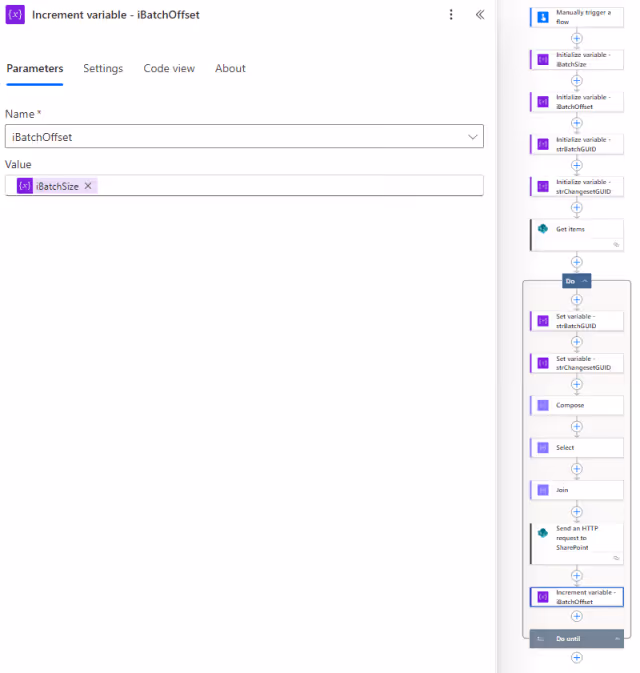
Step 8: Increment the Offset
Add an Increment variable action at the end of the loop.
In the Name field, select the variable iBatchOffset.
In the Value field, enter the expression:
variables('iBatchSize')This advances the offset by the batch size, setting the starting position for the next iteration.
SharePoint Behavior and Recycle Bin Recovery
Like the REST API, the Batch API supports either permanent deletion or recycle bin routing depending on the endpoint used inside the batch operations.
Compliance policies can override either behavior at the tenant level.
Performance and Throttling
The Batch API’s main advantage is throughput efficiency.
Instead of issuing hundreds or thousands of sequential requests, Power Automate submits relatively few batch requests while SharePoint processes the batched operations internally.
In practice, a batch containing many delete operations often completes only marginally slower than a single-item request because the network overhead is significantly reduced.
This substantially lowers throttling pressure compared to issuing one request per item. However, very large batch operations against heavily used lists can still encounter SharePoint service limits.
Troubleshooting and Edge Cases
Partial Completion
The flow reports success but only some items are deleted.
This commonly happens when Get items retrieves fewer items than expected due to pagination limits or Top Count settings. Verify how many records were actually retrieved before deletion begins.
Batch Formatting Failures
If the entire batch request fails, the issue is usually formatting-related:
- Incorrect boundary markers.
- Missing blank lines.
- Line ending mismatches.
If necessary, switch the Join delimiter as follows to force CRLF line endings:
decodeUriComponent('%0D%0A')Items Remain After a Successful Run
This is often caused by:
- Filter mismatches.
- Non-indexed filter columns.
- List threshold behavior on large lists.
If the filtered column is not indexed and the list exceeds 5,000 items, Get items may fail or return incomplete results.
HTTP 429 Errors Causing Timeouts
Power Automate automatically retries HTTP 429 responses, but repeated retry delays can eventually push a long-running flow past its maximum execution window.
Possible mitigations include:
- Lowering
Top Count. - Reducing concurrency.
- Adding
Delayactions. - Switching to the Batch API.
Advanced flows using HTTP actions may also benefit from customized retry policies rather than relying solely on default retry behavior.
Concurrent Flow Runs
If recurrence triggers overlap, multiple flow instances may attempt to delete the same items simultaneously.
This commonly produces batch-level HTTP 500 responses for items already removed by another run.
For high-volume deletion flows, consider implementing a lock mechanism or restricting the flow to a single concurrent run.
Summary
The deletion method that works perfectly in development is often the wrong one in production.
At small scale, almost any approach succeeds. At higher volume, request pressure, throttling behavior, recovery requirements, and failure visibility become architectural concerns rather than implementation details.
The Delete item action remains the safest and simplest option when recoverability matters. The REST API provides more direct HTTP-level control and clearer logging opportunities. The Batch API becomes the strongest option once request volume itself becomes the bottleneck, but it requires explicit response validation and much stricter implementation discipline.
Understanding how these methods behave under load is what separates a flow that merely works from one that remains reliable in production over time.