Automatically E-mail Power BI Dashboard Screenshots Using Power Automate
Keeping people up to date with dashboards sounds simple, but it rarely works that way in practice. Someone has to remember to open the report, navigate to the right page, and figure out what matters. For busy stakeholders, that step often gets skipped.
A better approach is to bring the data to them automatically. In practice, e-mail is still the easiest and most reliable way to do that.
With Microsoft Power Automate and Power BI, you can send dashboard snapshots on a schedule. Once set up, stakeholders receive the right view of the data at the right time without needing to log in.
This guide shows how to build that solution using native Microsoft 365 tools. No custom code or third-party services are required.
Solution Overview
At a high level, the process works as follows:
- A Power BI bookmark defines what is visible in the export.
- A scheduled Power Automate flow generates a screenshot of the report page.
- The image is embedded directly into an e-mail and sent automatically.
Prerequisites
Before you begin, confirm that your environment supports this solution.
-
Power BI Pro or Premium Per User (PPU) license.
The
Export To File for Power BI Reportsfeature used in this solution is only available for reports hosted in Power BI Pro or PPU workspaces. Reports in free-tier or shared capacity environments do not support this functionality, so a paid license is required. -
Access to Microsoft Power Automate.
Power Automate handles scheduling, calls the Power BI export API, and sends the e-mail. It is included in most Microsoft 365 business plans.
-
A report published to a workspace (not
My Workspace).The Power BI connector in Power Automate can only access reports published to a shared or team workspace. Reports stored in
My Workspaceare not accessible. If your report currently resides there, move it to a workspace before proceeding.
NOTE: Depending on your organization’s setup, this workspace may be backed by Pro, PPU, or Premium capacity. The key requirement is that the report is not in
My Workspace.
-
An Outlook or Exchange mailbox connected to Power Automate.
E-mails are sent through the Office 365 Outlook connector, which authenticates using your Microsoft 365 account.
A Note on Image Cropping
When Power BI exports a report page, it captures everything visible on that page as-is. This includes navigation buttons, filter panels, slicer controls, and any other UI elements your report contains. There is no built-in crop option in the export action, and Power Automate has no image editing capabilities.
To control what appears in the exported image (without creating a version specifically for the export), you need to handle visibility at the report level before the export runs. The way to do this is with Power BI bookmarks. A bookmark saves the state of a report page, including which elements are visible and which are hidden. By referencing a bookmark during export, you instruct Power BI to render the page in that saved state, effectively giving you a cropped and focused output.
Instructions
Step 1: Create a Bookmark for a Clean Screenshot
NOTE: This step is optional but recommended for a polished result.
- Open the report in Power BI Desktop.
-
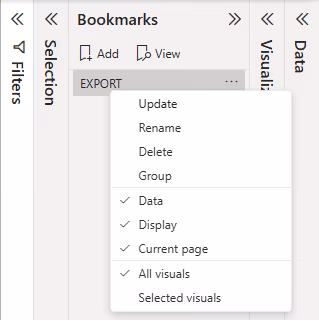
From the
Viewribbon, open theSelectionpane.This pane lists every object on the page, including visuals, buttons, shapes, and text boxes.
-
Hide the elements you do not want to appear in the screenshot by clicking the
eye iconnext to each one.In this example, the table visual is hidden. Common elements to hide include:
- Filter and slicer panels.
- Navigation buttons or bookmark bars.
- Page title text boxes.
- Decorative background shapes or logos.
- Once the page looks exactly as you want it to appear in the screenshot, open the
Bookmarkspane from theViewribbon. - Click
Addto create a new bookmark. - Right-click the bookmark. Ensure both
DataandDisplayare enabled.- The
Dataoption preserves the current filter and slicer state. - The
Displayoption captures which elements are shown or hidden.
- The
- Restore the report to its normal state if needed, then publish (or republish) it to Power BI Service so the bookmark is available in the service. This ensures that the bookmark captures a specific export view while the default report experience remains unchanged for interactive users.
Step 2: Get Your Workspace, Report, and Bookmark GUIDs
Before building the flow, you need three identifiers from Power BI:
Workspace GUIDReport GUIDBookmark GUID
-
Open the Power BI Service and navigate to the report.
The URL follows this structure:
https://app.powerbi.com/groups/{Workspace GUID}/reports/{Report GUID}/...- To find the
Bookmark GUID, click the bookmark in theBookmarkspane while viewing the report in Power BI Service. When the bookmark is selected and active, the URL will update to include:
bookmarkGuid={Bookmark GUID}NOTE: The
Workspace GUIDandReport GUIDare required by the export action in Power Automate. TheBookmark GUIDis only needed when exporting a specific bookmark view from Step 1.
- Copy and store each GUID value.
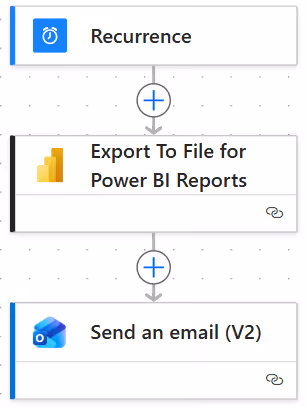
Step 3: Create the Scheduled Flow
In Power Automate, create a scheduled cloud flow that runs automatically on your chosen interval.
- In Power Automate, select
Createand chooseScheduled cloud flowfrom theStart from blanksection. - In the dialog that appears, give your flow a descriptive name.
- Set the start date and time and configure the recurrence interval to match how often you want the report delivered.
- Click
Createto open the flow editor. The recurrence trigger appears as the first step automatically.
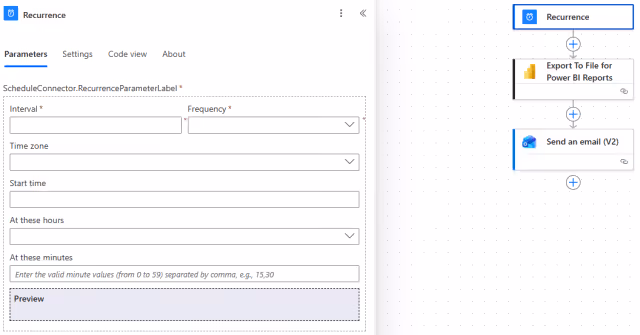
Step 4: Export the Report as an Image
This action calls the Power BI API and generates the screenshot.
- Below the recurrence trigger, add a new action and select
Export To File for Power BI Reports. - Sign in if prompted.
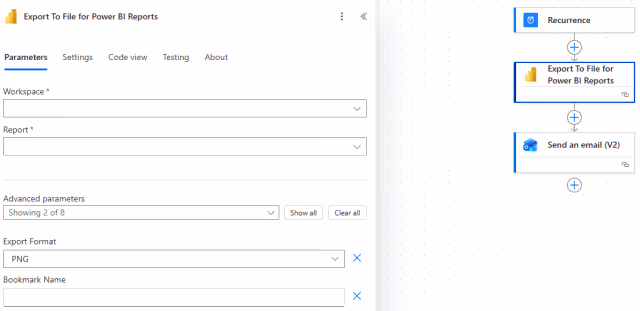
- Select your
Workspace(or enter theWorkspace GUIDvalue). - Select your
Report(or enter theReport GUIDvalue). - Set
Export FormattoPNG. - In the
Bookmark Namefield (advanced parameters), enter theBookmark GUIDvalue captured in Step 2.
This ensures Power BI renders the report using the correct pre-configured layout. If a Bookmark GUID is not provided, the export renders the report page in its default state, including all visible elements.
Step 5: Send the E-mail
Add the Send an email (V2) action from the Office 365 Outlook connector.
The output of the Export To File for Power BI Reports action provides the image data, which you can embed directly in the e-mail body.
Fill in the fields:
- In the
Tofield, provide recipient e-mail addresses separated by semicolons, or enter a distribution group address. - In the
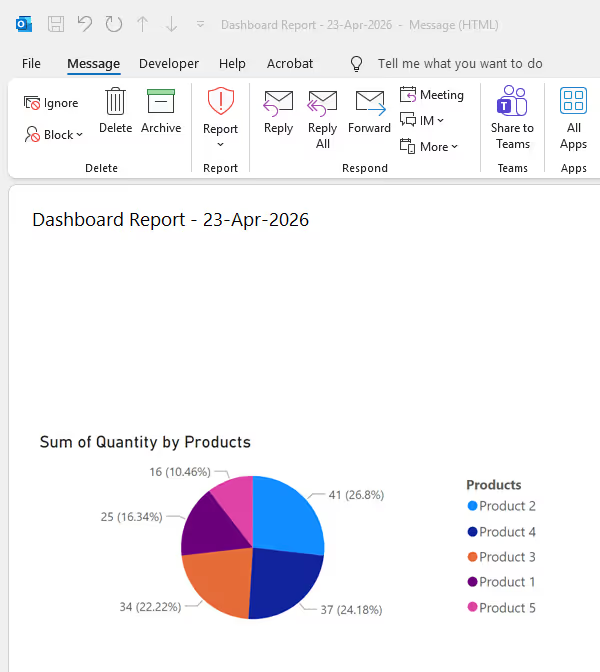
Subjectfield, provide a descriptive subject line. To include the current date dynamically, use the expression:
@{formatDateTime(utcNow(), 'dd-MMM-yyyy')}- In the
Bodyfield, embed the screenshot inline rather than as an attachment. Switch theBodyfield to HTML mode and use the following expression to reference the image output from Step 4:
@{dataUri(body('Export_To_File_for_Power_BI_Reports'))}Wrap it in a standard HTML image tag:
<img src="@{dataUri(body('Export_To_File_for_Power_BI_Reports'))}"/>This renders the screenshot directly inside the e-mail body. This method avoids file attachments and ensures the image is immediately visible when the e-mail is opened.

Step 6: Test, Validate, and Monitor
Before letting the flow run on its scheduled interval, test it manually to confirm the entire chain works correctly.
NOTE: When running tests, update the
Tofield in theSend an email (V2)action to send only to yourself or a small test group. Revert it to the full recipient list before going live.
NOTE: Make sure the flow is turned on before proceeding.
Running a Manual Test
- In the flow editor, click
Test. - Select
Manuallyand clickTestto trigger the flow immediately. - Watch each step execute in real time. A green checkmark indicates success. If a step fails, click it to read the error details.
- Check your inbox to confirm the e-mail arrived, the image renders correctly inside the body, and the bookmark state has been applied as expected.
Ongoing Monitoring
After deployment, check the run history regularly. Select your flow and review the 28-day run history panel. Failed runs will show which step encountered an error and why. Common causes include expired connector authentication and incorrect GUID values.
Tips for Better Results
-
Design report pages for export, not just interactive use.
Pages built for interactive exploration often have too many elements and too much chrome for a clean screenshot. Consider creating a dedicated export page that shows only the visuals you want recipients to see.
-
Use clear subject lines that include dates.
Recipients who receive regular reports in their inbox benefit from being able to identify each e-mail at a glance.
-
Duplicate (or enhance) the flow for other reports.
Once one flow is working, cloning it is straightforward. Update the GUIDs and recipient list and the new flow is ready to configure.
Summary
Automating Power BI dashboard e-mails ensures stakeholders receive timely updates without accessing Power BI directly. Power BI bookmarks allow you to control exactly what appears in each screenshot by rendering a saved report state. Embedding the image directly in the e-mail body makes the update immediately visible and easy to consume.