Power Query: Load Excel Data From Local, Web, or Current Workbook
Getting data into Power Query is often more frustrating than building the transformations themselves. Loading data from an Excel file typically means running through the same mental checklist: Where is the file? How is the data structured? Which function is needed?
Much of that friction comes down to one limitation: Excel.CurrentWorkbook() cannot read plain worksheet data. It only works with Excel tables, defined names, and dynamic arrays. That single constraint forces a shift to file paths, web addresses, and a completely different set of functions as soon as the data lives on a plain sheet.
This article covers two main scenarios: loading data from the current workbook and loading data from a local or web-based Excel file. Within each scenario, examples are provided for worksheet data, Excel tables, and defined names. The one exception is worksheet data in the current workbook scenario, which is not supported by Excel.CurrentWorkbook() and is addressed in Scenario 2 instead.
Scenario Data Overview
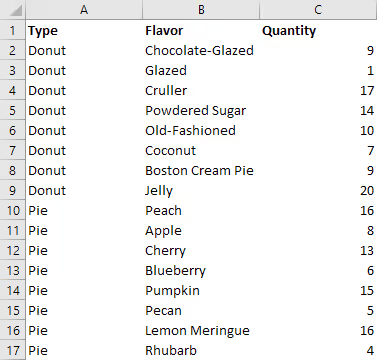
The examples in this article use a small dataset to illustrate each method. The data contains three columns: Type, Flavor, and Quantity. Each row represents a unique item, with the Type and Flavor columns containing text values and Quantity containing numeric values.
Scenario 1: Loading Data From the Current Workbook
Excel.CurrentWorkbook() retrieves data from the workbook where the query itself is stored. This refers specifically to the workbook containing the query, which may differ from whatever file is open at the time.
One practical benefit of this function is that it continues to work even if the file is renamed or moved. That makes it a good choice for files that change names regularly, like dated reports. The trade-off is that it cannot read plain worksheet data, so the data must be structured as an Excel table or defined name.
Method 1: Worksheet Data
Not supported. Excel.CurrentWorkbook() does not return plain worksheet data. If the data is on a plain sheet, use Scenario 2 instead.
Method 2: Excel Table
let
  Source = Excel.CurrentWorkbook(),
  TBL_EXAMPLE_DATA = Source{[Name = "TBL_EXAMPLE_DATA"]}[Content],
  #"Changed Type" = Table.TransformColumnTypes(
    TBL_EXAMPLE_DATA,
    {{"Type", type text}, {"Flavor", type text}, {"Quantity", Int64.Type}}
  )
in
  #"Changed Type"
Method 3: Defined Name
let
  Source = Excel.CurrentWorkbook(),
  RNG_EXAMPLE_DATA = Source{[Name = "RNG_EXAMPLE_DATA"]}[Content],
  #"Promoted Headers" = Table.PromoteHeaders(RNG_EXAMPLE_DATA, [PromoteAllScalars = true]),
  #"Changed Type" = Table.TransformColumnTypes(
    #"Promoted Headers",
    {{"Type", type text}, {"Flavor", type text}, {"Quantity", Int64.Type}}
  )
in
  #"Changed Type"
A defined name can also point to a dynamic array’s spill range using the spill reference operator (#), for example =Sheet1!$A1#. Once that defined name exists, Excel.CurrentWorkbook() reads it with the same code shown above. There is no separate access pattern for dynamic arrays.
Scenario 2: Loading Data From a Local or Web-Based Excel File
When the data comes from an Excel file stored on a local drive, network drive, SharePoint, or any web-accessible URL, the query structure is identical. The only difference is the function used to point Power Query at the file.
NOTE: For local and network files, use
File.Contents()with the full file path. For SharePoint and web-based files, useWeb.Contents()with the full URL. In both cases, the result is passed toExcel.Workbook()to parse the contents.
Excel.Workbook() takes two optional parameters beyond the file contents: useHeaders and delayTypes. Leaving useHeaders as null prevents Power Query from automatically promoting the first row of each sheet or table, which keeps header promotion explicit and consistent with Table.PromoteHeaders() later in the query. Setting delayTypes to true skips Power Query’s automatic type detection, which avoids conflicting type steps and leaves type assignment entirely to the explicit Table.TransformColumnTypes() step. Omitting these parameters, or leaving them at their defaults, is what causes columns to appear as Column1, Column2, and so on instead of using the actual header names.
How to Get the File Path or URL
- From the
Filetab in Excel, clickInfo. - Click
Copy path. - Remove
?web=1if it appears at the end of the path.
NOTE: If the file is renamed or moved, the query will break and must be updated.
To switch from a local file path to a web-based file path, replace:
File.Contents("C:\path\example.xlsx")with:
Web.Contents("https://path/example.xlsx")Method 1: Worksheet Data
let
  Source = Excel.Workbook(File.Contents("C:\path\example.xlsx"), null, true),
  Sheet1_Sheet = Source{[Item = "Sheet1", Kind = "Sheet"]}[Data],
  #"Promoted Headers" = Table.PromoteHeaders(Sheet1_Sheet, [PromoteAllScalars = true]),
  #"Changed Type" = Table.TransformColumnTypes(
    #"Promoted Headers",
    {{"Type", type text}, {"Flavor", type text}, {"Quantity", Int64.Type}}
  )
in
  #"Changed Type"
Method 2: Excel Table
let
  Source = Excel.Workbook(File.Contents("C:\path\example.xlsx"), null, true),
  TBL_EXAMPLE_DATA_Table = Source{[Item = "TBL_EXAMPLE_DATA", Kind = "Table"]}[Data],
  #"Changed Type" = Table.TransformColumnTypes(
    TBL_EXAMPLE_DATA_Table,
    {{"Type", type text}, {"Flavor", type text}, {"Quantity", Int64.Type}}
  )
in
  #"Changed Type"
Method 3: Defined Name
let
  Source = Excel.Workbook(File.Contents("C:\path\example.xlsx"), null, true),
  RNG_EXAMPLE_DATA_DefinedName = Source{[Item = "RNG_EXAMPLE_DATA", Kind = "DefinedName"]}[Data],
  #"Promoted Headers" = Table.PromoteHeaders(
    RNG_EXAMPLE_DATA_DefinedName,
    [PromoteAllScalars = true]
  ),
  #"Changed Type" = Table.TransformColumnTypes(
    #"Promoted Headers",
    {{"Type", type text}, {"Flavor", type text}, {"Quantity", Int64.Type}}
  )
in
  #"Changed Type"
Appendix: Structuring Data in Excel
This section can be skipped if the data is already structured as a worksheet, table, or defined name. It is included here as a reference for setting up data before connecting Power Query.
Plain Worksheet Data
Plain worksheet data is the simplest form: data sitting on a sheet with no special formatting or naming applied. In the examples throughout this article, the data lives on a sheet named Sheet1. This is the most common way data ends up in Excel and, as noted above, the most limited when working with Excel.CurrentWorkbook().
Creating an Excel Table
To create an Excel table:
- From the
Inserttab in Excel, in theTablessection, selectTable. - The
Create Tabledialog box is displayed. Verify that the referenced data set is correct. If the table includes column headers, verify that theMy table has headerscheckbox is enabled. - Click the
OKbutton. The selected data has been converted to an Excel table.
The new table is given a default name which is usually the label Table with a numeric suffix (for example, Table1 in this example).
The table name can be changed from the Name Manager:
- From the
Formulastab in Excel, in theDefined Namessection, selectName Manager. - The
Name Managerwindow opens. - Select the appropriate entry and click the
Edit…button. TheEdit Namewindow is displayed. - In the
Namefield, change the displayed name to a new name. - Click the
OKbutton when complete. - Returning to the
Name Managerwindow, the new name is now displayed in theNamecolumn. Click theClosebutton to exit theName Managerwindow.
Creating a Defined Name
Defined names apply a label to a cell range without converting it to a table. This is useful when named references are preferred in formulas or Power Query without changing how the data looks or behaves.
To create a defined name:
- From the
Formulastab in Excel, in theDefined Namessection, selectName Manager. - The
Name Managerwindow opens. Click theNew…button. TheNew Namewindow is displayed. - In the
Namefield, provide a new name for the data range. Verify that theRefers tofield references the correct data range including column headers where appropriate. - Click the
OKbutton when complete. - The
Name Managerwindow is displayed with the newly defined name. Click theClosebutton to exit theName Managerwindow.
Troubleshooting
A few errors come up repeatedly when loading Excel data into Power Query.
Expression.Error: The key didn't match any rows in the table. occurs when the name passed to [Name = "..."] or [Item = "..."] does not exactly match an existing table, sheet, or defined name. Common causes include a typo, a renamed table or sheet, or a case mismatch. Checking the exact name in the Name Manager or the sheet tab resolves this in most cases.
Combining Excel.CurrentWorkbook() with File.Contents() or Web.Contents() in the same query can trigger Formula.Firewall errors, since Power Query treats each source as a separate data source with its own privacy level. Setting consistent privacy levels for all sources involved, or combining the data after each source is loaded as its own query, avoids this.
The first refresh of a query using Web.Contents() against a SharePoint URL typically prompts for organizational account credentials. Selecting the correct authentication method and account when prompted, rather than canceling the dialog, allows the query to complete and store the credential for future refreshes.
Summary
Loading Excel data in Power Query comes down to two decisions: where the file lives and how the data is structured. Use Excel.CurrentWorkbook() when the data is in the same workbook as the query and formatted as a table, defined name, or dynamic array (referenced via a defined name). Use File.Contents() for local files or Web.Contents() for SharePoint and web-hosted files, both of which support worksheets, tables, and defined names, and both of which follow the same query structure. Understanding this framework avoids the need to relearn it every time.