Excel: Create Cascading Drop-Down Lists for Better Data Validation and Quality Control
When using Microsoft Excel to track data, one challenge is maintaining data quality when multiple users collaborate on the same workbook. Excel’s data validation feature helps by limiting data input to pre-defined options in a list. This works well for individual cells, but if one column depends on the value of another, then a more advanced solution is needed. This article explains how to create cascading drop-down lists in Excel using data validation and named ranges.
Instructions
Step 1: Define the Reference Data
Assume the data collection includes organization and department attributes. In this example, an organization is the parent of one or more departments. Set up the reference data on a separate worksheet, such as REFERENCES, as follows:
- Column A (
REF_ORGANIZATIONS) lists valid organizations for the organization drop-down list. In the sample data, there are three organizations namedOrganization 1,Organization 2, andOrganization 3. - Column B (
REF_ORGANIZATION_TO_DEPARTMENT_MAPPINGS) lists the names of three ranges that map departments to an organization. - Column D (
REF_ORGANIZATION_1_DEPARTMENTS) lists valid departments forOrganization 1. - Column E (
REF_ORGANIZATION_2_DEPARTMENTS) lists valid departments forOrganization 2. - Column F (
REF_ORGANIZATION_3_DEPARTMENTS) lists valid departments forOrganization 3.
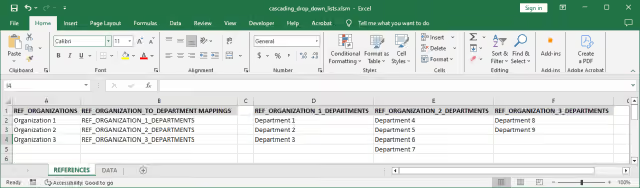
NOTE: Organization and department values may contain spaces or special characters (for example, “Sales & Marketing”), which are not valid in Excel range names. The mapping layer in Column B decouples the display values in Column A from the range names in Columns D through F, so the range names themselves can follow standard naming rules regardless of how the underlying values are formatted.
NOTE: In a shared workbook, consider protecting the
REFERENCESworksheet to prevent accidental edits to the underlying lists. From theReviewtab, clickProtect Sheet, and leave theSelect locked cellsoption enabled so users can still view the data if needed.
Step 2: Define the Named Ranges
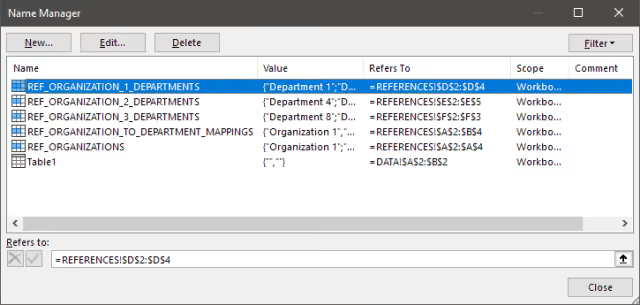
Now, define the named ranges referring to these reference lists.
- From the
Formulastab, clickName Manager. - Click the
New...button. - The
New Namedialog box is displayed. - In the
Namefield, enter theREF_name specified in Step 1. - In the
Refers tofield, enter or select the cell range containing the associated reference data. - Click the
OKbutton. - Repeat these steps for each named range.
NOTE: The key range,
REF_ORGANIZATION_TO_DEPARTMENT_MAPPINGS, links departments to an organization. This named range must include the values in both Column A and Column B in itsRefers tofield. Also, ensure the values in Column B match the department named ranges. This link will be used in aVLOOKUPandINDIRECTformula in a subsequent step.
Step 3: Define the Organization Data Validation (Parent Column)
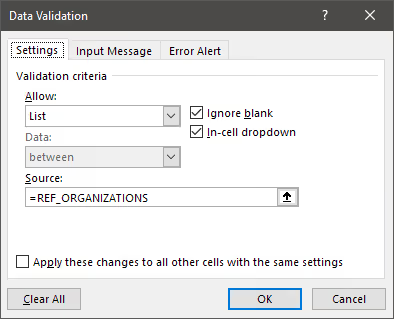
On the data collection worksheet, such as DATA, set up data validation for the organization column (Column A). This will display a drop-down list of valid organizations.
- Highlight the organization column (Column A).
- From the
Datatab, clickData Validation. - The
Data Validationdialog box is displayed. - In the
Allowdropdown, selectList. - In the
Sourcefield, enter=REF_ORGANIZATIONS. - Enable the
Ignore blankcheckbox. - Enable the
In-cell dropdowncheckbox. - Click the
OKbutton.
Step 4: Define the Department Data Validation (Child Column)
On the data collection worksheet, in this example DATA, create the data validation rule for the department column (Column B) using the following formula. This formula uses VLOOKUP to find the correct department range based on the selected organization and uses INDIRECT to reference that range.
Replace A2 with the organization cell in the current row if the worksheet uses a different starting row or layout.
- Highlight the department column (Column B).
- From the
Datatab, clickData Validation. - The
Data Validationdialog box is displayed. - In the
Allowdropdown, selectList. - In the
Sourcefield, enter the formula. - Enable the
Ignore blankcheckbox. - Enable the
In-cell dropdowncheckbox. - Click the
OKbutton. - The error message
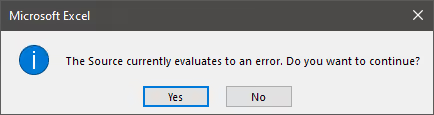
The Source currently evaluates to an error. Do you want to continue?might appear at this point. - Click the
Yesbutton to proceed.
=INDIRECT(VLOOKUP(A2,REF_ORGANIZATION_TO_DEPARTMENT_MAPPINGS,2,FALSE))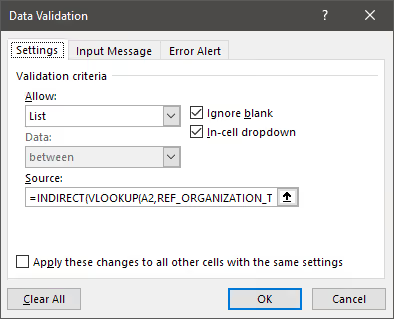
Step 5: Test the Cascading Drop-down Lists
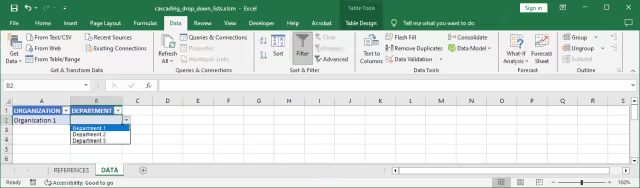
After setting up data validation, test the cascading drop-down lists. Selecting an organization filters the department list to only show relevant options for that organization.
NOTE: Data validation only restricts values entered through the drop-down or typed directly into the cell. Pasting a value copied from outside the validated range, or from another workbook, does not trigger validation and can insert an invalid entry. Testing paste behavior alongside the drop-down interaction is recommended before deploying the workbook to other users.
Step 6: Macro to Validate Parent/Dependent Relationship
To prevent errors, such as selecting a department that no longer matches the chosen organization, add a macro to update the department column when the organization selection changes.
Save the file as a macro-enabled workbook and add the following code to the worksheet. The macro clears the department entry if it is no longer valid. Adjust the code based on the specific columns.
- From the
Developertab, clickVisual Basic. - The
Microsoft Visual Basic for Applicationswindow is displayed. - Select the data collection worksheet, in this case
DATA. - Add the following code.
- Close the window and return to Excel.
Option Explicit

Private Sub Worksheet_Change(ByVal Target As Range)
  On Error GoTo exitHandler

  With Application
    .EnableEvents = False
    .ScreenUpdating = False
  End With

  If Target.Column = 1 Then
    If Target.Validation.Type = xlValidateList Then
      If Not Target.Offset(0, 1).Validation.Value Then
        Target.Offset(0, 1).ClearContents
      End If
    End If
  End If

exitHandler:
  With Application
    .EnableEvents = True
    .ScreenUpdating = True
  End With
End Sub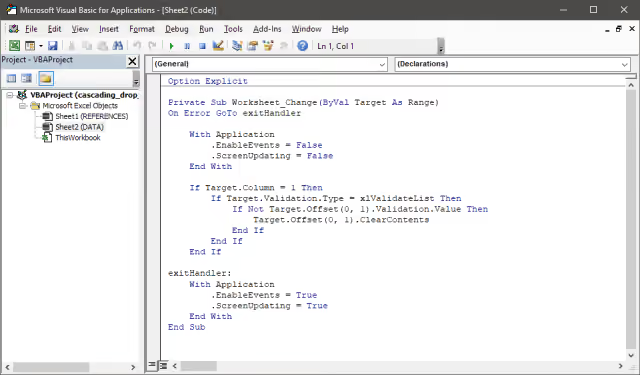
Results

After selecting an organization from the drop-down list, the department list shows only departments linked to that organization. Choosing a different organization triggers the macro, clearing the invalid department selection.
Extend to Additional Levels
The same pattern extends to a third level, such as adding a sub-department dependent on department. This requires an additional mapping range analogous to REF_ORGANIZATION_TO_DEPARTMENT_MAPPINGS, a third data validation rule using INDIRECT and VLOOKUP against that mapping, and an extension of the Worksheet_Change macro to clear the sub-department value when department changes.
Summary
By setting up cascading drop-down lists in Excel, accurate and consistent data entry can be maintained in multi-user workbooks. This process uses data validation, named ranges, and formulas like VLOOKUP and INDIRECT to create dynamic, dependent selections. With the addition of a macro, data integrity can be further ensured by automatically correcting any mismatches between parent and child values.