Excel VBA: Improve Excel Range Evaluation by Trimming Unused Cells
Passing unnecessarily large ranges can easily make Excel slow or unresponsive. Although it is convenient to use whole-column references, especially when the data boundaries are unknown, this practice is not ideal. As users add or remove data, formulas must adapt dynamically, but referencing entire columns often includes thousands of empty cells, slowing down performance.
While built-in Excel functions handle this well by efficiently working within the used data range, custom VBA procedures and functions may not. They can struggle with performance due to inefficient data access and unnecessary evaluation of empty cells.
To address this, the MinifyRange function described in this article helps limit the number of cells processed by narrowing a large range down to only the cells that contain data. Using MinifyRange allows UDFs to retain the flexibility of whole-column references while avoiding unnecessary evaluation of empty cells. It is important to note that MinifyRange trims only the empty boundary cells, not the empty cells within the used data range.
For Microsoft 365 users, Excel also includes a native TRIMRANGE function that trims empty rows and columns from a range and returns a trimmed range reference. For example, =TRIMRANGE($B:$F) trims the same reference used in the example below, leading and trailing, rows and columns, down to only the cells containing data. A shorthand syntax, called a trim reference, achieves a similar result by adding a period next to the colon in a range reference instead of calling the function directly (for example, A:.A trims trailing blank rows from a full-column reference).
MinifyRange covers both contexts. It can be called from a worksheet formula the same way as TRIMRANGE, and it can also be called directly from within VBA procedures and functions. It also works in Excel versions without TRIMRANGE, including Excel 2019, 2021, and 2024.
Instructions
Create a New VBA Module
- From the
Developertab in Excel, clickVisual Basic. - In the
Visual Basic for Applicationswindow, go toInsert>Module. - Paste the following code into the new module and close the editor.
Option Explicit

Private Function FindFirstUsedCell(rng As Range) As Range
  Set rng = Intersect(rng, rng.Parent.UsedRange)
  Set FindFirstUsedCell = rng.Find("*", _
    Cells(rng.Row + rng.Rows.Count - 1, _
          rng.Column + rng.Columns.Count - 1), _
    xlValues, , xlByRows, xlNext)
End Function

Private Function FindLastUsedCell(rng As Range) As Range
  Set rng = Intersect(rng, rng.Parent.UsedRange)
  Set FindLastUsedCell = rng.Find("*", rng.Item(1), _
    xlValues, , xlByRows, xlPrevious)
End Function

Public Function MinifyRange(rng As Range) As Range
  Dim columnRange As Range
  Dim firstCell As Range
  Dim lastCell As Range
  Dim minRow As Long: minRow = 0
  Dim maxRow As Long: maxRow = 0
  Dim minCol As Long: minCol = 0
  Dim maxCol As Long: maxCol = 0
  Dim colIndex As Long

  If Not rng Is Nothing Then
    Set rng = Intersect(rng, rng.Parent.UsedRange)
    If Not rng Is Nothing Then
      For colIndex = rng.Column To rng.Column + rng.Columns.Count - 1
        Set columnRange = rng.Worksheet.Range( _
          rng.Worksheet.Cells(rng.Row, colIndex), _
          rng.Worksheet.Cells(rng.Row + rng.Rows.Count - 1, colIndex))

        Set firstCell = FindFirstUsedCell(columnRange)
        Set lastCell = FindLastUsedCell(columnRange)

        If Not firstCell Is Nothing Then
          If minRow = 0 Or firstCell.Row < minRow Then
            minRow = firstCell.Row
          End If
          If minCol = 0 Or firstCell.Column < minCol Then
            minCol = firstCell.Column
          End If
        End If

        If Not lastCell Is Nothing Then
          If maxRow = 0 Or lastCell.Row > maxRow Then
            maxRow = lastCell.Row
          End If
          If maxCol = 0 Or lastCell.Column > maxCol Then
            maxCol = lastCell.Column
          End If
        End If
      Next colIndex
    End If
  End If

  If minRow <> 0 And minCol <> 0 And maxRow <> 0 And maxCol <> 0 Then
    Set MinifyRange = rng.Worksheet.Range( _
      rng.Worksheet.Cells(minRow, minCol), _
      rng.Worksheet.Cells(maxRow, maxCol))
  Else
    Set MinifyRange = Nothing
  End If
End Function
Usage
The MinifyRange(range) function can be called from VBA code or nested inside worksheet formulas that accept a range argument. It takes a single argument, a cell or range, and returns a trimmed version that excludes empty boundary rows and columns.
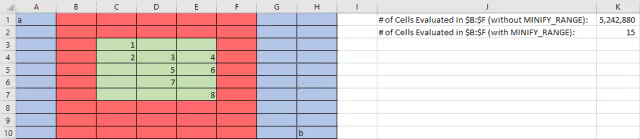
Suppose there is data in cells A1:H10. If $B:$F is passed as the input range, Excel sees this as 1,048,576 rows across five columns (5,242,880 cells). This is far more than necessary for the task.
The MinifyRange function reduces this reference to only the part of the range that contains actual data. After trimming, only a smaller section, like C3:E7 (or 15 cells), is evaluated.
Results
To show how this helps, the following is a simple helper function:
Option Explicit

Public Function Loopy(rng As Range) As Long
  Dim cell As Range
  Dim cellCount As Long: cellCount = 0

  For Each cell In rng
    cellCount = cellCount + 1
  Next cell

  Loopy = cellCount
End Function
Without MinifyRange
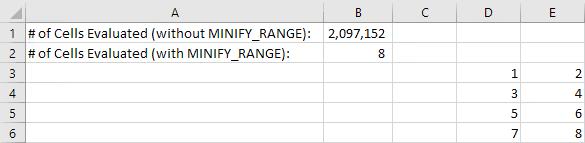
=Loopy($D:$E)This evaluates 2,097,152 cells.
With MinifyRange
=Loopy(MinifyRange($D:$E))This evaluates only the 8 used cells (for example, D3:E6), drastically improving performance.
Summary
Using whole-column references in Excel can severely impact performance by forcing evaluation of millions of cells. The MinifyRange function solves this by dynamically trimming the range to only used cells. This makes formulas more efficient while keeping them flexible for dynamic data. For VBA workflows, especially in Excel versions without native TRIMRANGE support, MinifyRange provides a comparable result.