How to Display the File Last Updated Date in Power BI Using Excel VBA or Power Query
In this article, two methods to display the last updated date for an Excel file in Power BI are demonstrated. Both methods use an Excel file as the data source, although the second method can work with any file type. To clarify, these methods do not rely on the Power BI timestamp for when the report was published or last refreshed. Instead, the first method retrieves Excel’s internal Last Save Time property, while the second retrieves the file system’s Date modified timestamp.
Instructions
Method 1: Excel VBA
The first method uses a custom VBA function in Excel to retrieve the Last Save Time property.
Step 1: Create a User-Defined Function (UDF) to Retrieve Last Save Time
- From the
Developertab in Excel, clickVisual Basic. - The
Microsoft Visual Basic for Applicationswindow will open. - From the
Insertmenu, clickModuleto add a new module (namedModule1in this example). - Open
Module1and add the following code to create the custom function that retrieves the last save timestamp:
Option Explicit

Function Last_Saved_Timestamp() As Date
  On Error GoTo errorHandler

  With Application
    .ScreenUpdating = False
    .EnableEvents = False
  End With

  Last_Saved_Timestamp = ThisWorkbook.BuiltinDocumentProperties("Last Save Time")

errorHandler:
  With Application
    .ScreenUpdating = True
    .EnableEvents = True
  End With

  If Err.Number <> 0 Then
    MsgBox Err.Description
  End If
End Function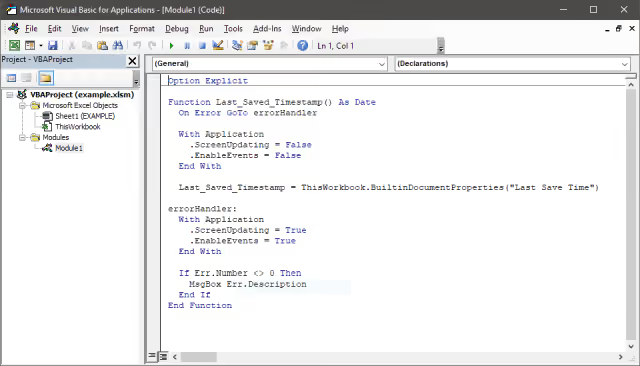
Step 2: Force Full Recalculation Before Save
- From Microsoft Visual Basic for Applications, open
ThisWorkbook. - Add the following code. This code forces a full recalculation of the workbook and updates the timestamp before saving the file.
- Close the
Microsoft Visual Basic for Applicationswindow.
Option Explicit

Private Sub Workbook_BeforeSave(ByVal SaveAsUI As Boolean, Cancel As Boolean)
  On Error GoTo errorHandler

  With Application
    .ScreenUpdating = False
    .EnableEvents = False
  End With

  Application.CalculateFull

errorHandler:
  With Application
    .ScreenUpdating = True
    .EnableEvents = True
  End With

  If Err.Number <> 0 Then
    MsgBox Err.Description
  End If
End Sub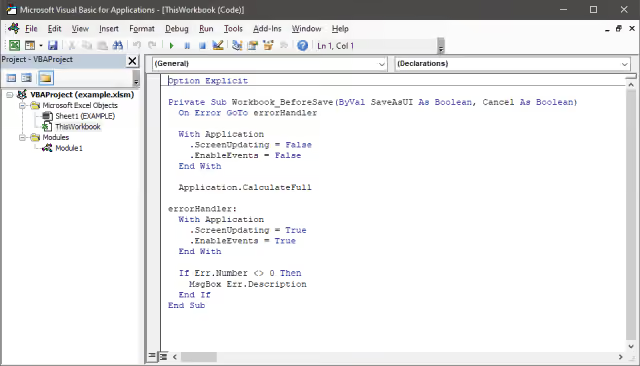
Step 3: Retrieve Last Save Time
- From Excel, create a new worksheet (named
EXAMPLEin this case). - In cell
A1, enterLAST SAVED DATE. - In cell
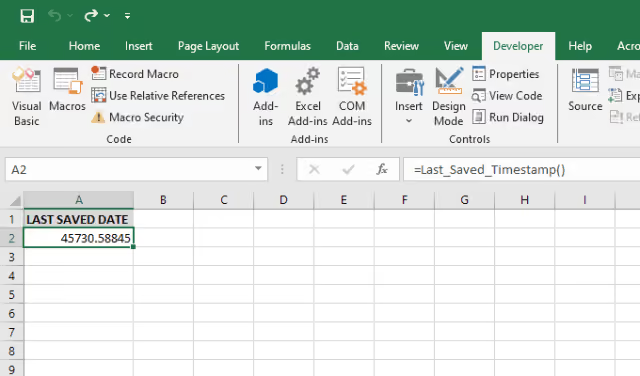
A2, use the custom VBA function by entering:
=Last_Saved_Timestamp()- The timestamp will appear as a serial number.
- Save and close the Excel file.
Step 4: Load Data Into Power BI
- From the
Hometab in Power BI Desktop, clickGet dataand selectExcel workbook. - Select the Excel file created earlier and click the
Openbutton. - In the
Navigatorwindow, checkEXAMPLEand click theLoadbutton. - The
EXAMPLEtable and theLAST SAVED DATEfield will be available in theDatapane. - If
LAST SAVED DATEis summarized, turn off summarization. In theDatapane, clickLAST SAVED DATE, then from theColumn toolstab, selectDon’t summarizefrom theSummarizationdrop-down. - In the
Data typedrop-down, selectDate. If prompted with aData type changewarning, click theYesbutton. - In the
Formatdrop-down, choose the desired date format.

Step 5: Display Data Last Updated Date Using a Card Visualization
- Switch to
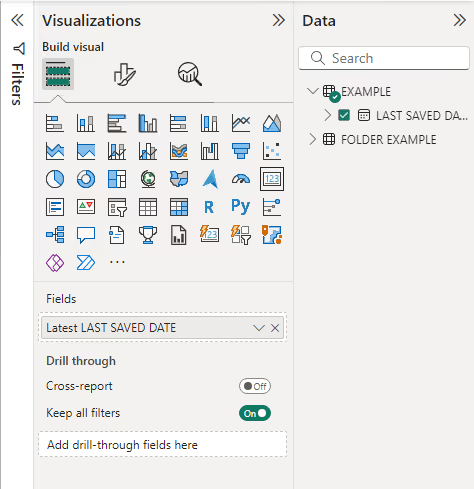
Reportview, add aCardvisualization, and dragLAST SAVED DATEfromEXAMPLEinto theFieldssection. - If it defaults to
Earliest, change it toLatest. This step may not be necessary if only one entry exists in the table, but changing it toLatestis recommended as a precaution. - In the
Formatsection, turn off theCategory labeland adjust the font size and other attributes as needed.
Method 2: Power Query File Properties
The second method uses Power Query to retrieve the Date modified timestamp from the file system properties. This method works with any file type, not just Excel.
Step 1: Get Data
- From the
Hometab in Power BI Desktop, clickGet dataand selectMore.... - In the
Get Datadialog box, chooseFileand thenFolder, and click theConnectbutton. - In the
Folderdialog box, enter or browse to the parent folder of the data file. Click theOKbutton. - Another dialog box will appear, listing the files in the selected folder. Click the
Transform Databutton. - The
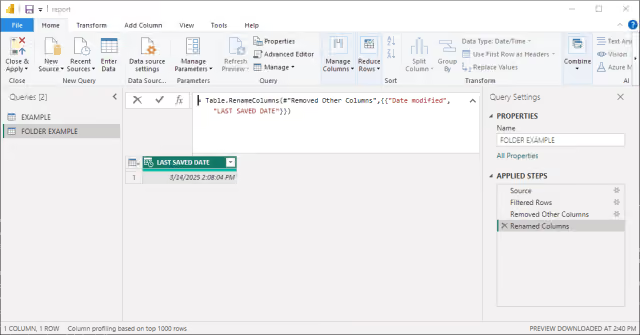
Power Querywindow will open. The first step in the query is labeledSource, which returns the file list. Verify that the list is correct. - Filter the
Namecolumn so that only the file used by the Power BI report appears. - Select the
Date modifiedcolumn. From theHometab, selectRemove ColumnsandRemove Other Columns. - Rename the
Date modifiedcolumn toLAST SAVED DATEto maintain consistency with the first method. - In the
Query Settingspane underProperties, rename the query to something descriptive, likeFOLDER EXAMPLE. This name will appear in theDatapane in Power BI. - From the
Hometab, clickClose & Apply.
Here is the final query code after applying all filters and transformations:
let
  Source = Folder.Files(
    "C:\test"
  ),
  #"Filtered Rows" = Table.SelectRows(Source, each ([Name] = "example.xlsm")),
  #"Removed Other Columns" = Table.SelectColumns(#"Filtered Rows", {"Date modified"}),
  #"Renamed Columns" = Table.RenameColumns(
    #"Removed Other Columns",
    {{"Date modified", "LAST SAVED DATE"}}
  )
in
  #"Renamed Columns"
NOTE: In this demonstration, the file is located at
C:\test\example.xlsm. Adjust the query as necessary.
Step 2: Load Data Into Power BI
- Returning to Power BI, the
FOLDER EXAMPLEtable and theLAST SAVED DATEfield will be available in theDatapane. - If
LAST SAVED DATEis summarized, turn off summarization. In theDatapane, clickLAST SAVED DATE, then from theColumn toolstab, selectDon’t summarizefrom theSummarizationdrop-down. - In the
Data typedrop-down, selectDate. If prompted with aData type changewarning, click theYesbutton. - In the
Formatdrop-down, choose the desired date format.
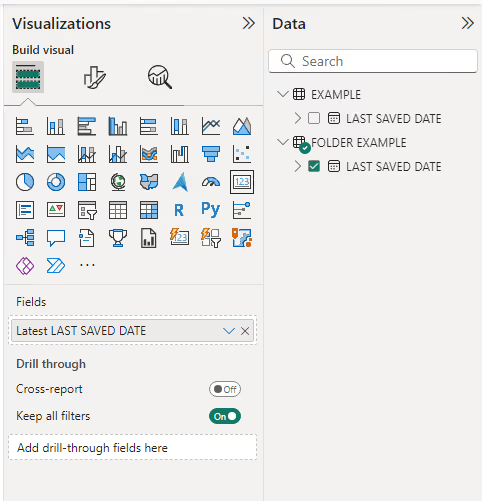
Step 3: Display Data Last Updated Date Using a Card Visualization
- Switch to
Reportview, add anotherCardvisualization, and dragLAST SAVED DATEfromFOLDER EXAMPLEinto theFieldssection. - If it defaults to
Earliest, change it toLatest. This step may not be necessary if only one entry exists in the table, but changing it toLatestis recommended as a precaution. - In the
Formatsection, turn off theCategory labeland adjust the font size and other attributes as needed.
Results
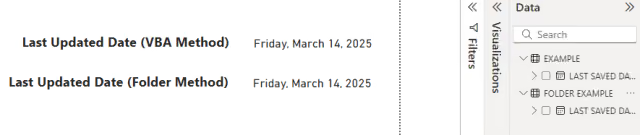
Both methods produce the expected timestamp in this example, as shown in the screenshot below. When the Power BI report is refreshed, each card visualization updates to reflect the latest value returned by its respective method.
Summary
Both methods display a timestamp associated with the source file in Power BI. The Excel VBA method retrieves Excel’s internal Last Save Time property, while the Power Query method uses the file system’s Date modified timestamp. Although these values often match, they originate from different sources and may differ depending on how the file is modified. The best method depends on the data source and reporting requirements.