Power BI: Create and Display a Dynamic Last Refreshed Timestamp
This article covers creating and displaying a “Last Refreshed” timestamp in Power BI. This timestamp will automatically update each time the semantic model is refreshed, ensuring the audience can easily verify that they are reviewing the most recent data.
Instructions
Step 1: Create a Last Refreshed Timestamp
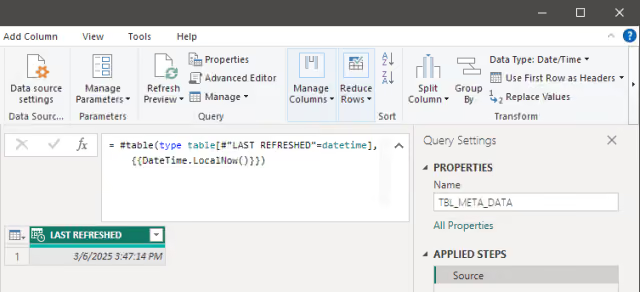
This step uses Power Query to create a dynamic table containing the current local date and time. This value updates each time the semantic model (queries/data) is refreshed and remains static until the next refresh.
- From the
Hometab in Power BI, clickGet dataand selectBlank query. - The Power Query window is displayed.
- From the
Hometab in Power Query, clickAdvanced Editor. - Replace any existing code with the following:
let
  Source = #table(type table [#"LAST REFRESHED" = datetime], {{DateTime.LocalNow()}})
in
  Source
NOTE: The example uses
DateTime.LocalNow(), which returns the client machine’s local time when viewing the report in Power BI Desktop. Other options includeDateTime.FixedLocalNow(),DateTimeZone.LocalNow(), andDateTimeZone.FixedLocalNow(). However, keep in mind that with any of theseLocalNowfunctions, the timestamp will display in UTC when the report is viewed in the Power BI service, creating a mismatch between the local time in Power BI Desktop and UTC in the cloud. Consistency can be maintained usingDateTimeZone.UtcNow()orDateTimeZone.FixedUtcNow()to display the timestamp in UTC in both Power BI Desktop and the Power BI service.
- Click the
Donebutton to close theAdvanced Editorwindow. - From the
Query Settingspane underProperties, change theNameto a relevant name for Power BI (for example,TBL_META_DATA). - From the
Hometab in Power Query, clickClose & Apply.
Step 2: Create and Format a Last Refreshed Measure
With TBL_META_DATA available in the Data pane, the next step creates a measure to use in a text box.
- From the
Datapane, highlightTBL_META_DATA. - From the
Table toolstab, clickNew measure. - Enter the following expression formula (adjust the format as needed):
MEASURE_LAST_REFRESHED
  = FORMAT ( MAX ( TBL_META_DATA[LAST REFRESHED] ), "dddd, mmmm d, yyyy" )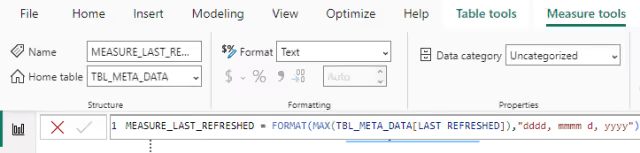
Step 3: Insert Text Box to Display Last Refreshed Timestamp
The following step adds a text box to show the timestamp on the report.
- From the
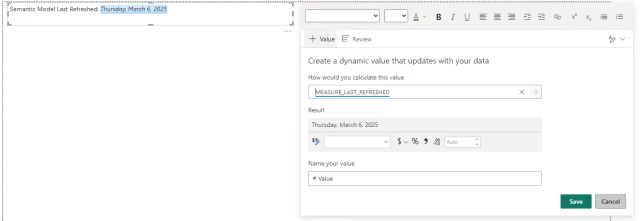
Inserttab, clickText box. - The
Create a dynamic value that updates with your databox is displayed. - In the
How would you calculate this valuefield, enterMEASURE_LAST_REFRESHED. - The
Resultdisplays the formatted value of the field. - Click the
Savebutton. - Customize the text box by adding static text if needed (for example,
Semantic Model Last Refreshed).
Results
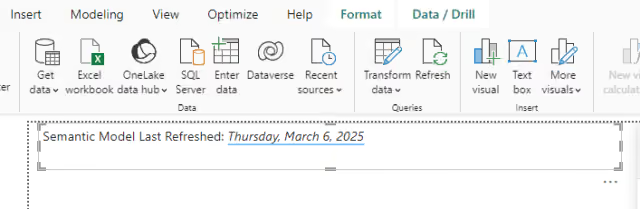
Every time the report refreshes, whether manually or on an automatic schedule, the timestamp updates. Since the text box uses a dynamic value, the latest refresh date is always shown in the report.
Summary
These steps produce a dynamic “Last Refreshed” timestamp that updates automatically with each data refresh, keeping the report’s audience informed of the most recent refresh date.